Battlefield Walks
27 of the most interesting walks on the Italian Front
General
Walking in the mountains can be dangerous, so please be responsible for your own safety. That means proper preparation — physical, mental and material. Some of these walks are quite challenging in terms of elevation gain and physical effort needed, so be realistic about your abilities and don’t bite off more than you can chew. Consider the total distance, elevation, the amount of elevation gain, the terrain underfoot, and the likely atmospheric conditions. Never be afraid to turn back if things start to unravel, and try not to compound any bad decisions by making more of them. Also, consider how embarrassed you would feel if nice people had to risk their lives saving yours. For non-EU citizens, medevac is fearsomely expensive, so activity-specific insurance cover is a good idea.
Many paths have signposts that tell you the time it takes to walk to the next place. Be aware that these times are for fit people who don’t stop to rest, pee, or take photos. Being old, I tend to add 20 per cent to these times, more if it’s all above 2,000 m and the air is thinner.
The weather (hot or cold) can have very serious effects, so get a good forecast, keep an eye on the weather as you hike, and be prepared regarding clothing, equipment, itinerary, potential escape routes, nearest shelters, etc. I always carry an emergency bivvy bag in case I break an ankle and have to spend a night out.
Generally, it’s a good idea to get an early start if hiking in the holiday season because the paths and rifugi in popular areas such as the Dolomites can get quite busy. This is less of a problem elsewhere on the Front. Most rifugi only accept cash, so make sure you have enough with you.
Clothes
For hiking in the mountains, jeans and a T-shirt won’t cut it. They’re fine for gentle wanders on the Carso or Altopiano, but in the mountains you need to wear wicking base layers, snug midlayers, and take waterproof hardshell trousers and jacket. I’d add seamless underwear to that list, because if you’re taking 20,000+ steps a day you don’t want chafing. When walking on the Carso and Bainsizza in summer, be aware of snakes and ticks. Long sleeves and long trousers tucked into socks are a good idea. And you’ll need a brimmed hat and sun-block.
Footwear
Decent, comfortable, appropriate footwear is important. You don’t necessarily need boots for every hike, in dry conditions I often wear approach-shoes which are grippy and lighter than boots. That said, boots will give you better ankle stability and better protection against snake-bites. If in doubt, wear boots. If you expect to encounter snow (often year-round in sheltered north-facing areas above 2,000 m), a pair of gaiters and crampons are a must.
Water
Take slightly more water than you need to get to the next water source. Maps will show you the locations of water-troughs and springs, and it’s usually fine to drink from streams if you’re high up and a long way from civilisation. Take sterilising tablets if you’re concerned. Expect to get through a litre of water an hour minimum, and quite a lot more in hot weather or when climbing steeply. I generally carry 2.5 litres in a “CamelBak” and 0.75 litres in a drinks bottle, and top up whenever the opportunity presents itself. Dehydration is a significant hazard, affecting both mental and physical performance, so take it seriously.
Food
It’s also important to take fuelling seriously, because you can expect to burn around 400 calories an hour while hiking in the mountains. I’ve tried to recommend routes that include a rifugio for rest and refreshment, but that’s not always possible.
Consider what supplies you’re going to take with you — their weight, size, and nutritional value. I always carry energy bars (proper sports ones, not the crappy kind you get in newsagents) and a couple of energy gels. Gels with added caffeine are great as an emergency get-you-home measure, but don’t expect to sleep well afterwards.
Kit
Paper maps and a compass are essential, no matter how good you think your phone/sat-nav is. And you need to know how to use them. Fully charge all electronic devices, and take a power-bank and appropriate leads with you. I generally use the OutdoorActive app for planning and navigating, but there are several other options too. Downloading an app such as PeakFinder to your phone will help identify the terrain around you.
A comfortable backpack is an obvious necessity, around 15 - 20 litres capacity for day hikes, 30 litres plus for hut-to-hut hikes. A drinks bladder with a mouth tube means you don’t have to take off your pack to drink. I’m a big fan of hiking poles, which give more stability on uneven terrain. If you're heading a long way from civilisation where you may not get a phone signal, it might be worth investing in a Garmin InReach, a satellite communicator that works pretty much anywhere on earth.
Take a first-aid kit with blister plasters, a spare bootlace, zip-ties, and some duct tape, for emergency repairs. I have put a full kit list in the Appendices pages.
Parking
Please park considerately, so as not to obstruct farmers and loggers (they have huge machines, and don’t care about your paintwork). Cars parked in popular hiking areas are quite appealing to thieves who know the occupants are likely to be gone for some time, so don’t leave anything visible/valuable in your car. I always leave the luggage cover off so that it’s obvious there’s nothing in the car worth stealing. Depending on the remoteness of the hike, I sometimes leave a note in the windshield that gives my name, my hiking route, expected time of return, and emergency phone numbers in case I’m in a crevasse and the car is still there the next day.
Hut Etiquette
Book spaces in advance during busy periods (easier said than done, unfortunately), and make sure you have enough cash to pay for food and accommodation. Some huts have smaller rooms in addition to the dormitories, which are slightly more expensive but much quieter.
Washing facilities are usually very basic, some huts have hot showers which you pay for with a token (be quick, you only get a couple of minutes).
Take your boots off when you arrive and wear whatever hideous footwear the hut provides (usually Crocs sized either 32 or 50).
Hiking poles, crampons, ice axes and ropes should be put in the appropriate storage room, and not taken into the rifugio proper.
Don’t clutter communal spaces with your stuff, and don’t put your pack on benches, tables or bunks.
Do not make any extra work for the staff, their job is hard and their wages are small.
Evening meals are served at a specific time…don’t be late.
If you want a packed lunch for the following day, ask the Custodian the afternoon before.
Use a sleeping bag or bag liner, huts supply blankets and pillows.
Ear plugs and head torch are essential.
Don’t hog all the power points, and be aware some huts turn the electricity off at night.
Keep the noise down. Seriously. THIS IS IMPORTANT!
Make your bed/bunk before you depart.
If all this sounds a bit fierce and regimented, it’s out of necessity. Consideration is paramount, and the Custodian's word is law.
Trail Etiquette
Don't litter. This shouldn't need saying, and I'm sure you lot are decent, considerate people, but some aren't, and some inadvertently litter.
Toilet breaks — pee well away from the trail and nowhere near a water course. WRT poo, ideally bag it and carry it out with you. This is a bit “icky” for most people, so the alternative is to bury your poo at least 15 cm down, at least 30 m away from the trail or water course.
Follow the path, and don't be tempted by "desire line" shortcuts. Yes, it'll be fractionally quicker, but it erodes the ground around the path and makes maintenance more difficult.
Don't build cairns made of rocks lying around nearby. It's terrible for the environment (it disturbs insects and increases erosion), and it makes it hard to differentiate cairns built for navigation from ones built for a poxy Instagram photo. The same applies to writing “Darren hearts Tracy” in stones — it's graffiti, it's an eye-sore, and its damaging to the environment. Please, LEAVE NO TRACE.
If hiking with a dog, keep it on a leash if there is any livestock or wildlife around. I use a cooling harness for my Labrador, which keeps him cool, and has a handle on the top for helping him over difficult rocks and gullies. I also use a 3.4m long stretchy leash, which can attach round my waist, so that he has freedom to manoeuvre but is still under control.
Finally, if you post any photos from these hikes on social media please use the #ThunderInTheMountains or #TiTM hashtags. Thank you.
Please note, you undertake these hikes at your own risk, and neither myself nor the publisher can accept any blame for any mishaps that occur. As always, proper preparation prevents piss-poor performance.
Maps & Guides
A few recommendations
Maps (Tabacco 1:25,000, except where indicated)
Isonzo/Soca Front:
047 Carso Triestino e Isontino
054 Collio - Brda - Gorizia
041 Valli del Natisone - Cividale del Friuli
019 Alpi Giulie Occidentali - Tarvisiano
Julijske Alpe (Kartografija, 1:50,000)
Carnic Front:
018 Alpi Carniche Orientali - Canal del Ferro - Nassfeld
09 Alpi Carniche - Carnia Centrale
01 Sappada - S. Stefano - Forni Avoltri
072 Lienzer Dolomiten - Lesachtal - Obertilliach - Lienz
010 Sextener Dolomiten
Dolomites:
010 Sextener Dolomiten
017 Dolomiti di Auronzo e del Comelico
03 Cortina d’Ampezzo e Dolomiti Ampezzane
07 Alta Badia - Arabba - Marmolada
015 Marmolada - Pelmo - Civetta - Moiazza
06 Val di Fassa e Dolomiti Fassane
Lagorai:
06 Val di Fassa e Dolomiti Fassane
014 Val di Fiemme - Lagorai - Latemar
058 Valsugana - Tesino - Lagorai - Cima d’Asta
Altopiano & Monte Grappa:
058 Valsugana - Tesino - Lagorai - Cima d’Asta
050 Altopiano dei Sette Comuni - Asiago - Ortigara
051 Monte Grappa - Basano - Feltre
Pasubio/Trento/Garda:
056 Piccole Dolomiti - Pasubio
057 Levico - Altopiani di Folgaria Lavarone e Luserna
061 Alto Garda - Ledro - Monte Baldo Nord
071 Prealpi Gardesane - Tremalzo - Valle di Ledro - Lago d'Idro
Adamello & Ortles:
052 Adamello Presanella
08 Ortles - Cevedale
Walking & Via Ferrata Guidebooks
The Julian Alps of Slovenia, Justi Carey and Roy Clark, Cicerone
Via Ferratas of the Italian Dolomites, Vol 1 & 2, Graham Fletcher and John Smith, Cicerone
Glacier Travel and Crevasse Rescue, Neil Chelton and Mike Thomas, VDiff Climbing
The Karnischer Höhenweg, John Hayes, Cicerone
Shorter Walks in the Dolomites, by Gillian Price, published by Cicerone
Walking in Italy’s Stelvio National Park, Gillian Price, Cicerone
Ski Touring and Snowshoeing in the Dolomites, James Rushforth, Cicerone
The Dolomites: Rock Climbs and Via Ferrata, James Rushforth, Rockfax
Klettersteigatlas: Alpen, Paul Werner and Irisa Kurschner, Bergverlag Rother
12 Itinerari MTB in Val d’Adige, Rafaele Ganzerli, self-published
Easy Visits for Less Active Travellers
All these visits are suitable for those who are less active, or who don't wish to hike up massive mountains. They are accessible by car, there is parking close by, and they involve only shorts walks across easy terrain.
Isonzo & Carso
Redipuglia Ossuary, museum and trenches opposite. Toilets and refreshments.
Monte Sabotino, trenches and caverns. Toilets and refreshments.
Oslavia Ossuary. No facilities.
Cerje, memorial and museum, toilets and refreshments on site.
Gorizia Castle, WW1 museum. Toilets and refreshments.
Kolovrat Ridge, preserved trenches. Snacks on site, toilets and refreshments at nearby Koča Solarie refuge.
Kobarid WW1 Museum. Toilets at the museum, refreshments nearby.
Carnic Alps
Kotschach 1915-1918 Museum. Toilets, and refreshments nearby.
Forte Mitterberg (Sexten). Pre-book visit at Sexten Tourist Office. No facilities.
Dolomites
Nasswand Austro-Hungarian cemetery. No facilities.
Forte di Landro. No facilities.
Cinque Torri. Chairlift up, short walk, toilets and refreshments at rifugio.
Pian de Salesei cemetery. No facilities.
Marmolada 3000m WW1 museum. Cable car up, toilets and refreshments.
Moena Museo della Grande Guerra. Toilets on site, refreshments nearby.
Altopiano
Asiago ossuary. No facilities.
Canove Great War Museum. Toilets on site, refreshments nearby.
Forte Verle. No facilities.
Forte Belvedere. Refreshments and toilets.
Barenthal/Boscon/Granezza CWGC cemeteries. No facilities.
Riva-Ledro
Monte Zugna. Toilets and refreshments at rifugio.
Rovereto Great War Museum. Toilets and refreshments.
Castel Dante Ossuary. No facilities.
Nagià-Grom trenches. No facilities.
Bezzecca trenches. No facilities.
Adamello-Ortler
Vermiglio Great War Museum. Toilets on site, refreshments nearby.
Forte Strino. No facilities.
Passo Tonale Ossuary. Toilets and refreshments nearby.
Temù Museo della Guerra Bianca. Toilets on site, refreshments nearby.
Passo Umbrail WW1 installation. No facilities.
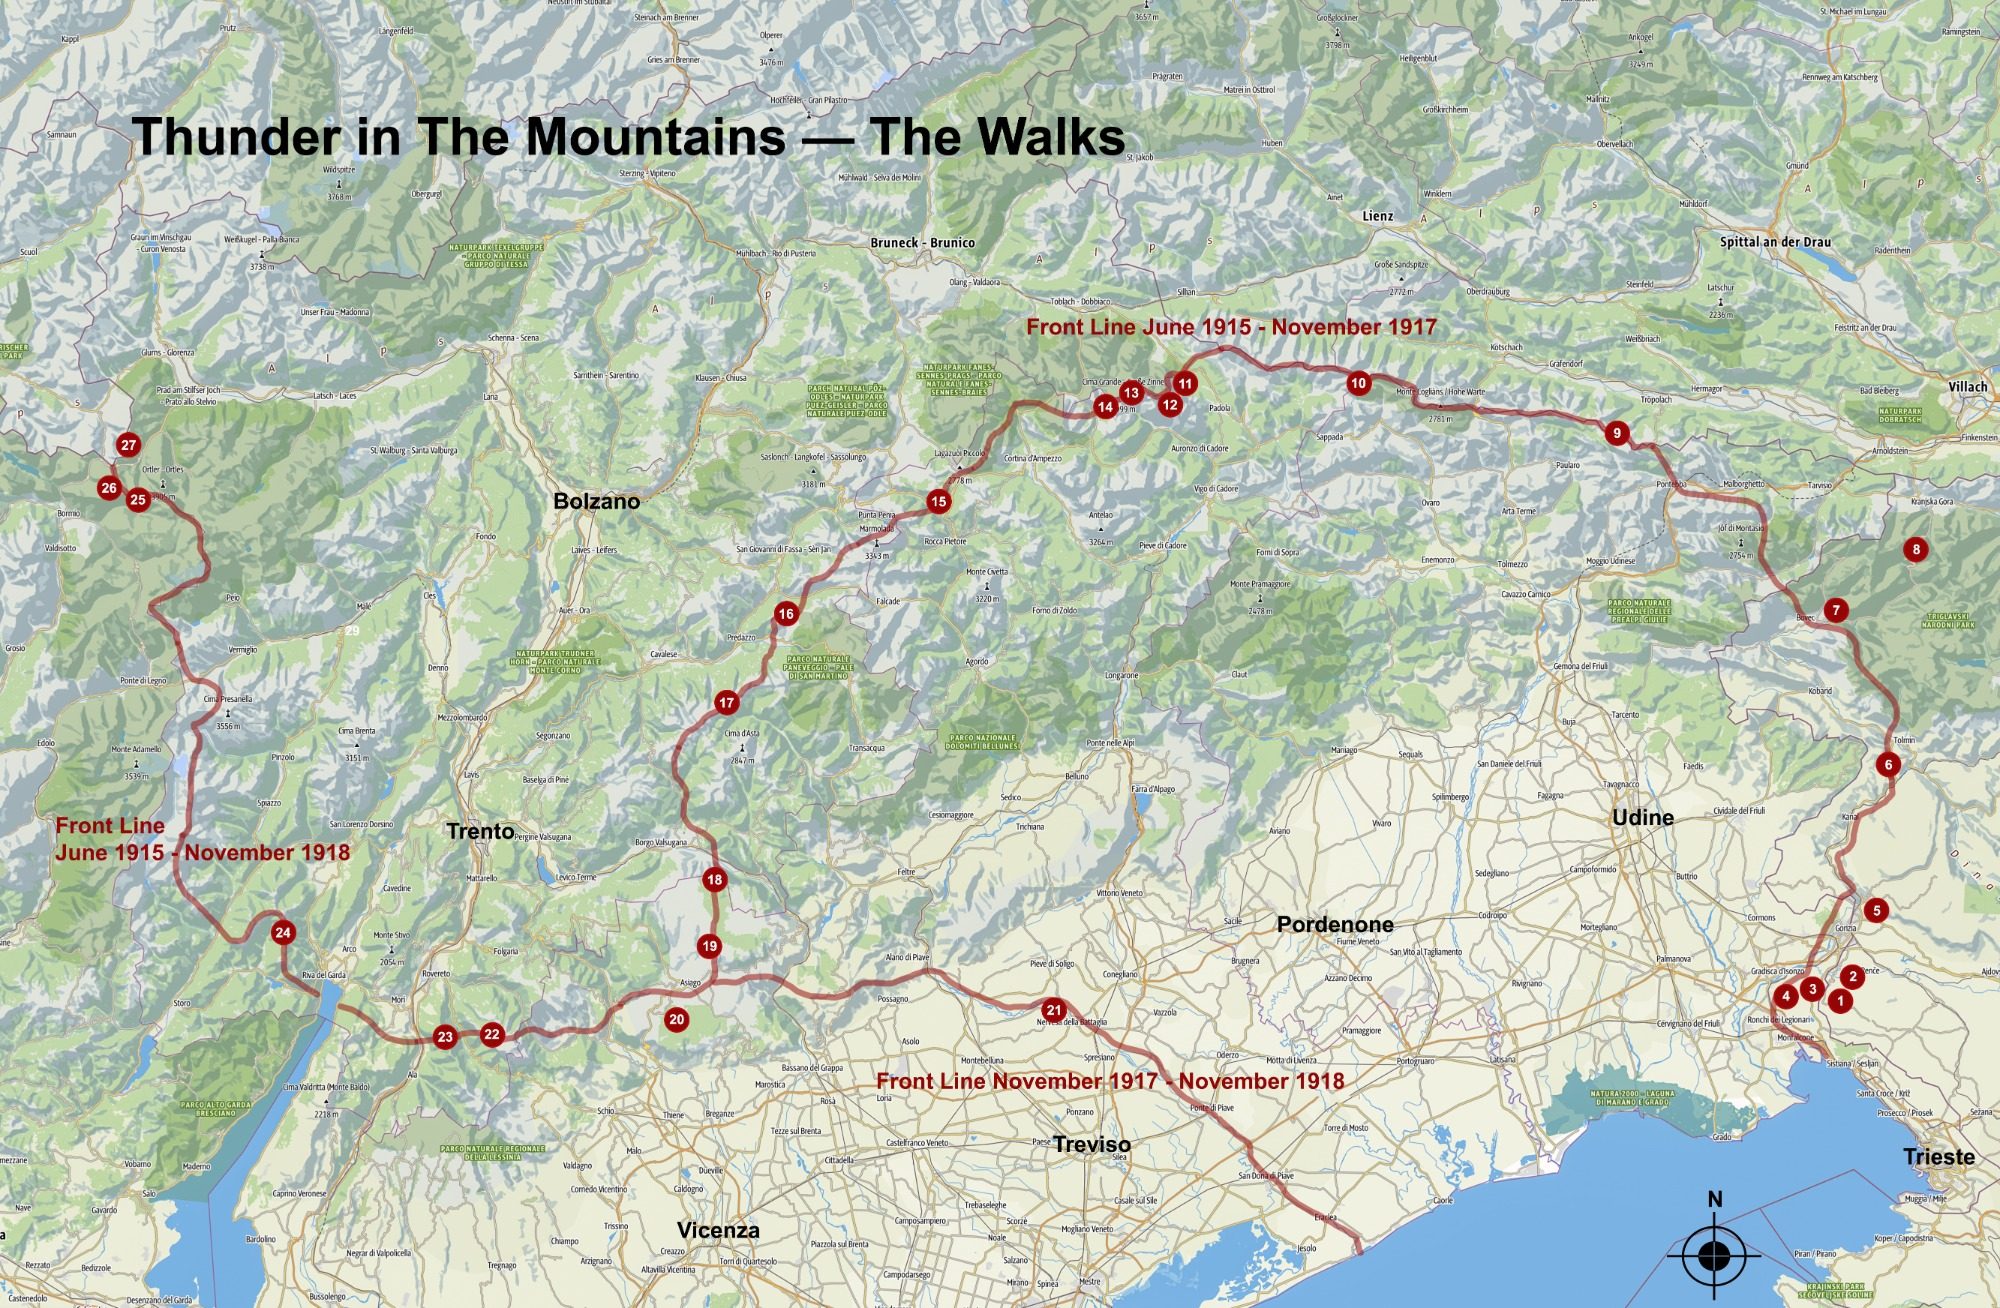
The Walks
The difficulty levels for these walks are based on my own experience as a moderately fit man in his early 60s, carrying an 8 kg backpack. I use OutdoorActive for planning and navigating, but other apps (Komoot, etc) are available. What I like about OutdoorActive is that trenches on the Isonzo/Soča are marked on it in blue, and old military structures are also marked. It's advisable to carry a paper map and compass, as well. Please click on the button to download a GPX file of that route, that can then be used in your app of choice. When the new window opens, click on the three dots in the top right-hand corner to see download options.
* Denotes additional transport (4x4 taxi, chair-lift, lengthy walk-in, snowmobile, shuttle bus, etc) is required to reach the trail head.
Please take care, and try not to get yourself hurt/stuck/lost.
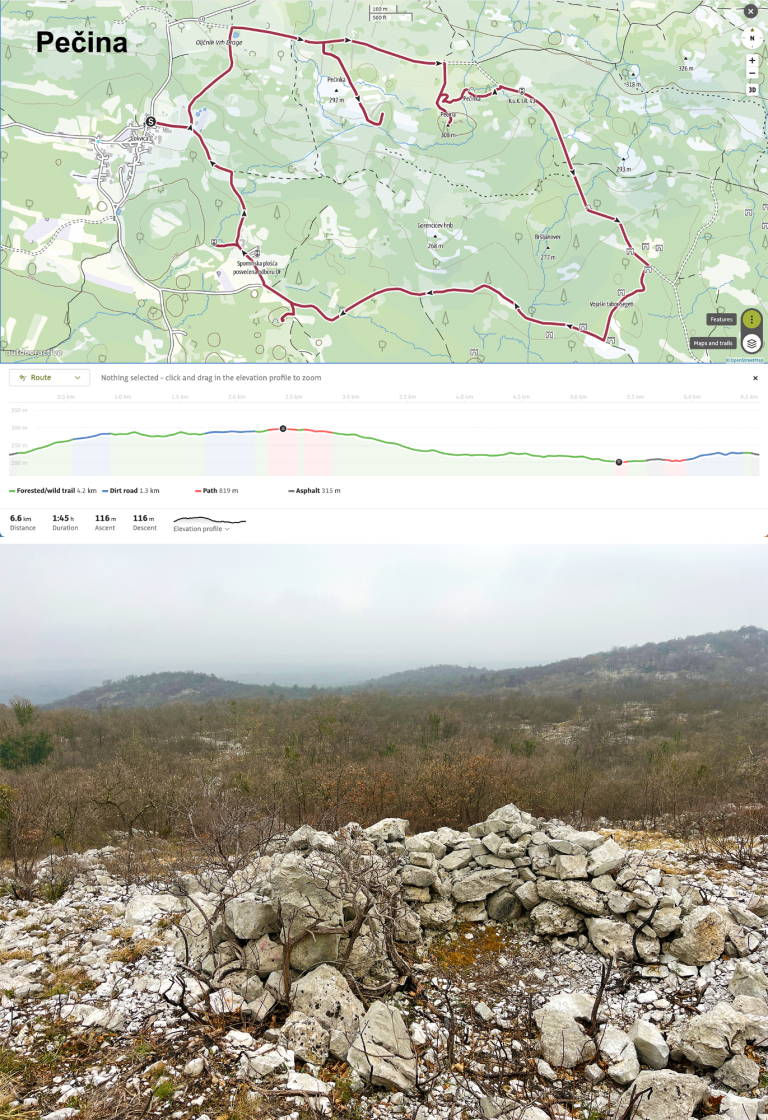
1 Pečina
6.6 km, 125 m ascent, 1:45 walking time, allow 3 hours. Easy.
A walk through the heart of the action on the northern Carso. Park in Lokvica and make your way in a clockwise loop around Pečinka and Pečina, taking the short diversions to see caves and positions. The 360-degree views from the top of Pečina show why it was called the “Eye of the Carso”, and nearby is the famous KuK 43 IR memorial and “Boroević’s throne”, a rock that looks a bit like a seat. Further south (around 4 km from your starting point) you walk through the numerous remains of the large Austrian military village that was built in the lee of Bršljanovec hill (the trenches and footings for barracks are clearly visible). Continuing on you take a short detour to see the cavern that housed the Novara Brigade HQ, and another to see the trenches between Segeti and Lokvica. Return to the car.
Warning: You undertake this walk at your own risk, and neither the author nor publisher can accept any responsibility if things go wrong.
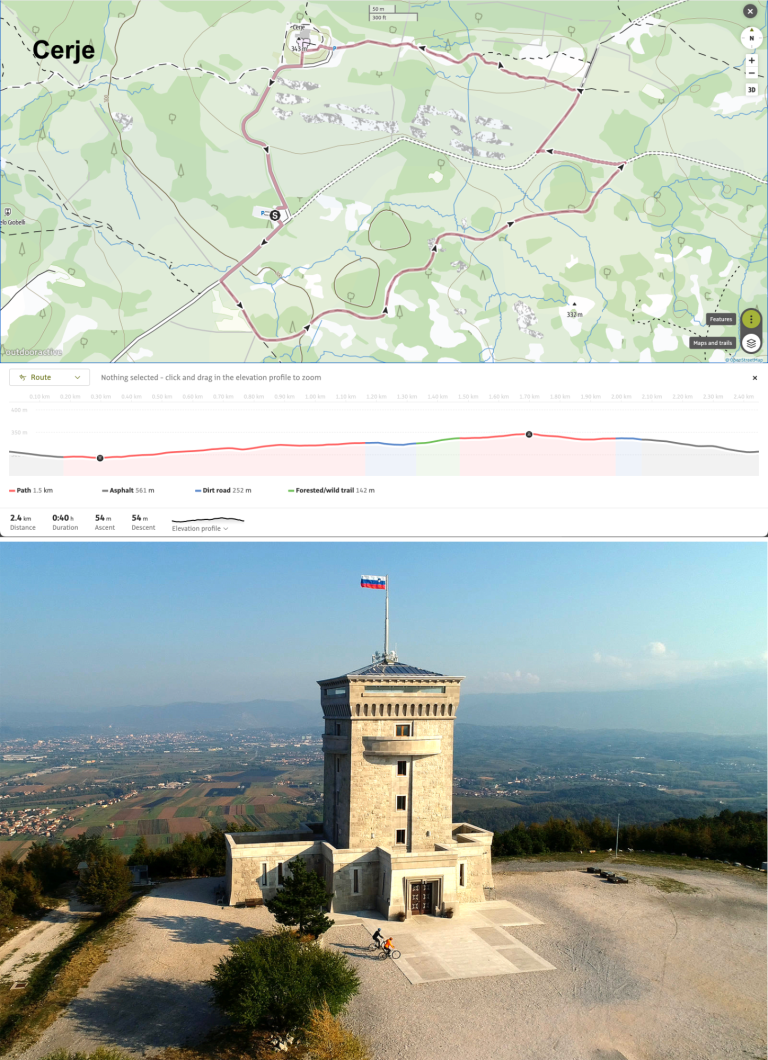
2 Cerje
2.6 km, 55 m ascent, walking time 0:40, allow 2 hours. Easy.
This walk is best done in the winter, because the undergrowth in summer makes trenches difficult to find (plus there’s the whole snakes and ticks thing on the Carso). From the carpark at Cerje follow the route in an anti-clockwise direction. You’ll cross assorted trench lines, mostly Austrian ones that were subsequently repurposed by the Italians. After 2 km you’ll arrive at the Cerje memorial, which has info boards and great views of the Carso and Vipava river. It also has an excellent little café and toilet facilities. Return to the car. Can be combined with the Pečina walk.
Warning: You undertake this walk at your own risk, and neither the author nor publisher can accept any responsibility if things go wrong.
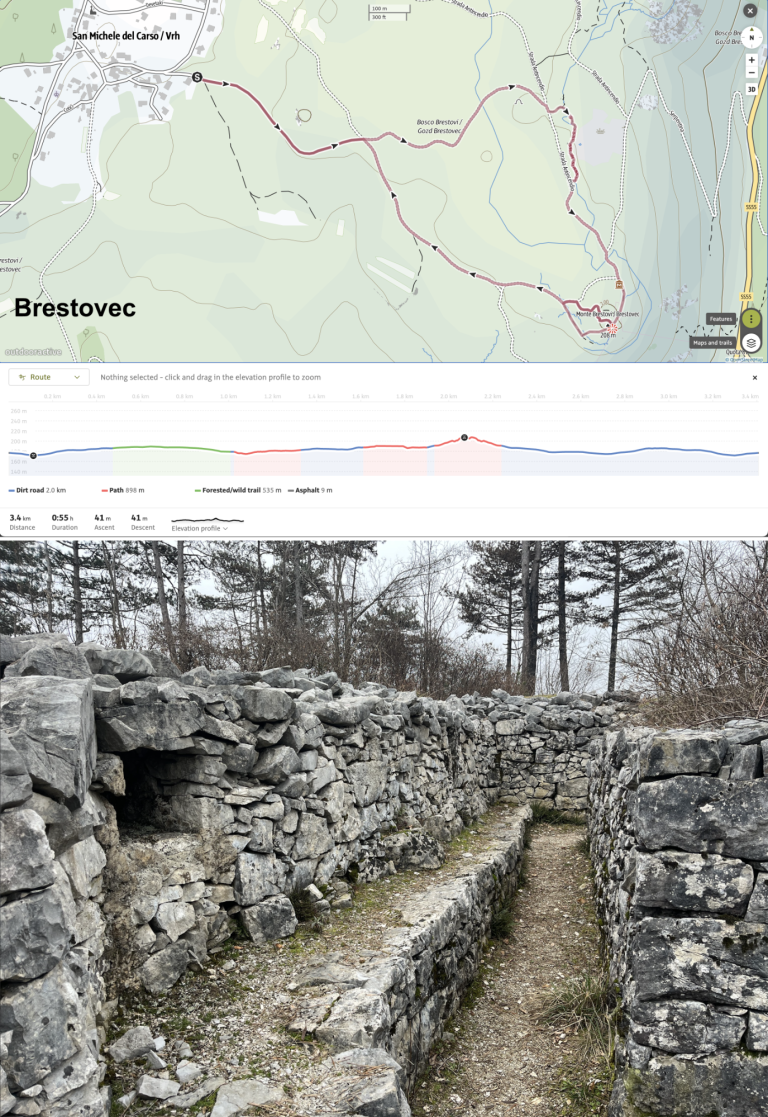
3 Brestovec
3.4 km, 41 m ascent, walking time 1:00, allow 1.5 hours. Easy.
This walk can be done in conjunction with a visit to nearby Monte San Michele. Park somewhere on the southern outskirts of San Michele del Carso and follow the route in a clockwise direction. After 1 km you’ll come to a 200 m section of Italian trenches, then 300 m later the artillery tunnel built by the Italians after the 6th Isonzo. When you exit the tunnel, take the path on your right up to the top of Monte Brestovi/Brestovec where you get impressive views across the Vallone. In more recent times this was the Iron Curtain. Follow the route back to the car.
Warning: You undertake this walk at your own risk, and neither the author nor publisher can accept any responsibility if things go wrong.
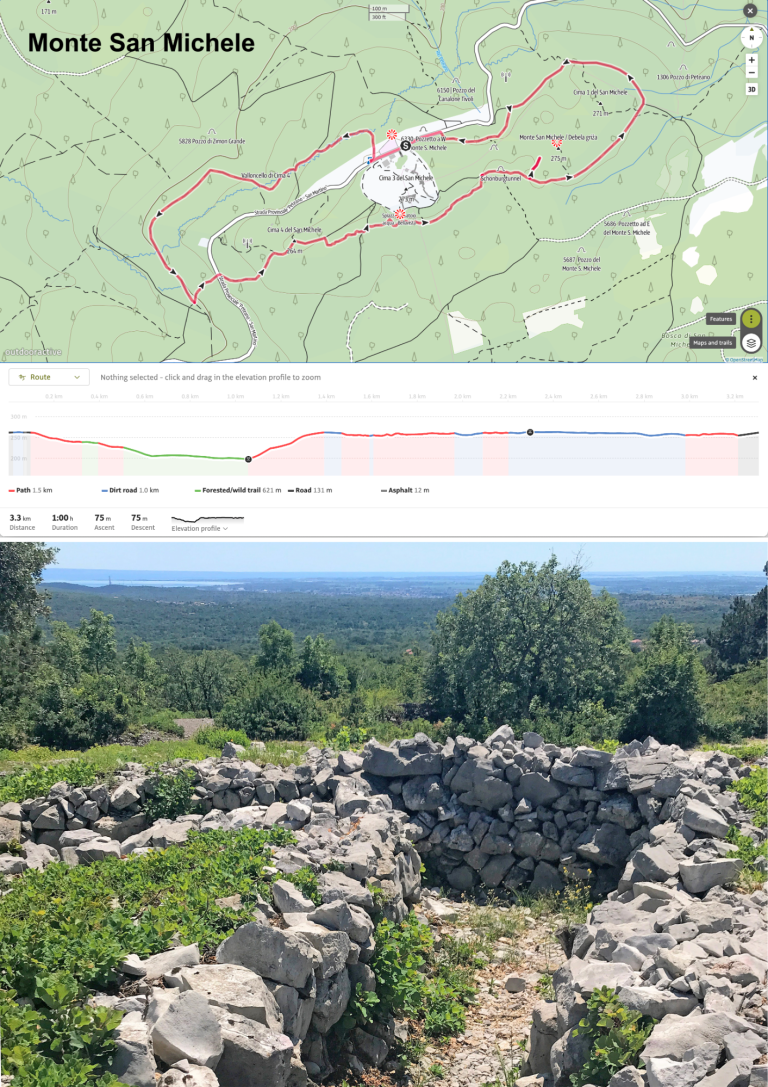
4 Monte San Michele
3.4 km, 96 m ascent, walking time 1:05, allow 2 hours. Easy.
Park at the museum building of Monte San Michele and admire the view across the lower Isonzo from the terrace opposite. Then take the path that descends north, between the bins and the toilets (sounds lovely, eh?) that leads to the old Austrian trenches. Follow the route along the trenches, and then around behind Cima 3 past the Schönburgtunnel to Cima 1, and then return to the car park. Explore the artillery tunnels next to the museum building, and imagine the noise of six-inch guns being fired in here.
Warning: You undertake this walk at your own risk, and neither the author nor publisher can accept any responsibility if things go wrong.
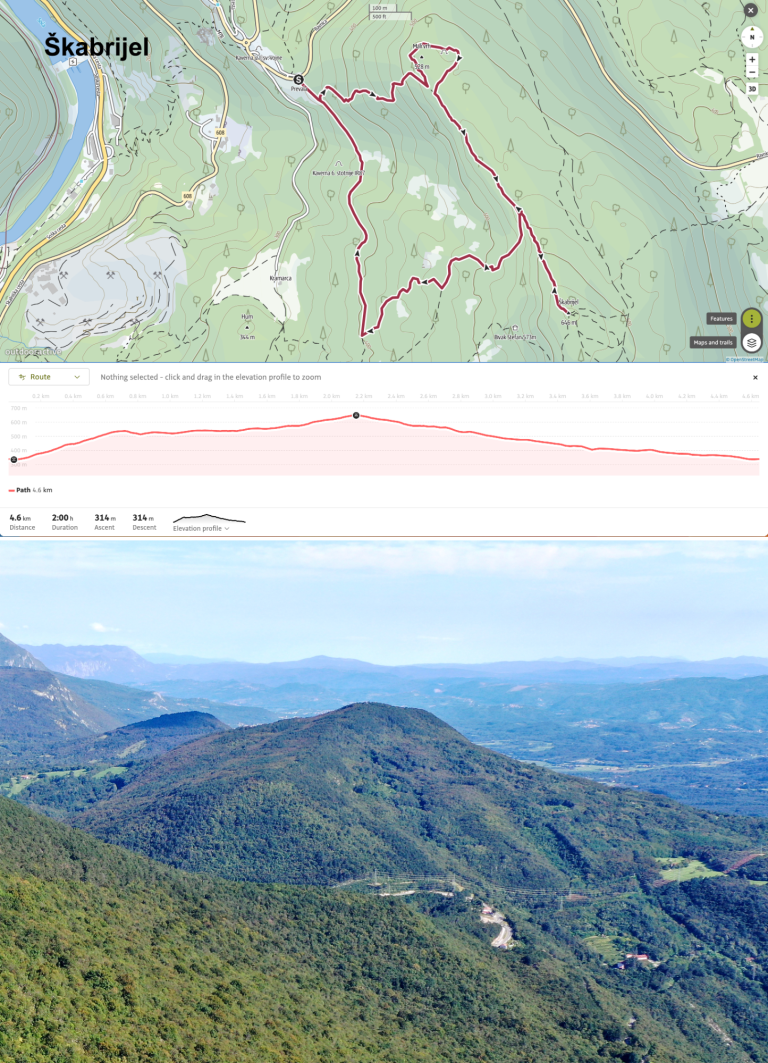
5 Škabrijel
4.6 km, 314 m ascent, walking time 2:00, allow 3 hours. Easy-Medium.
Another vitally important, blood-soaked hill, Škabrijel saw some of the most intense, close-quarters fighting imaginable. Park in the parking area underneath the power pylons, next to the Boroević installation, and have a look at the info boards. Cross the road, follow the path south-east for 100 m, then turn left up the steep slope. Follow the route around Q526 (Veliki hrib), past a Honvéd memorial, and continue up to the summit past numerous trenches and caverns. From the top of the observation tower you can clearly see the Collio, Monte Sabotino and Monte Santo, and appreciate how exposed this hill was. Walk back towards Veliki hrib for 400 m and then turn sharp left down the hill. This slope, denuded of vegetation during the war, is what faced the attacking Italian infantry, and they died here by the thousand. At the bottom of the path turn right (north) and walk back to the car.
Warning: You undertake this walk at your own risk, and neither the author nor publisher can accept any responsibility if things go wrong.
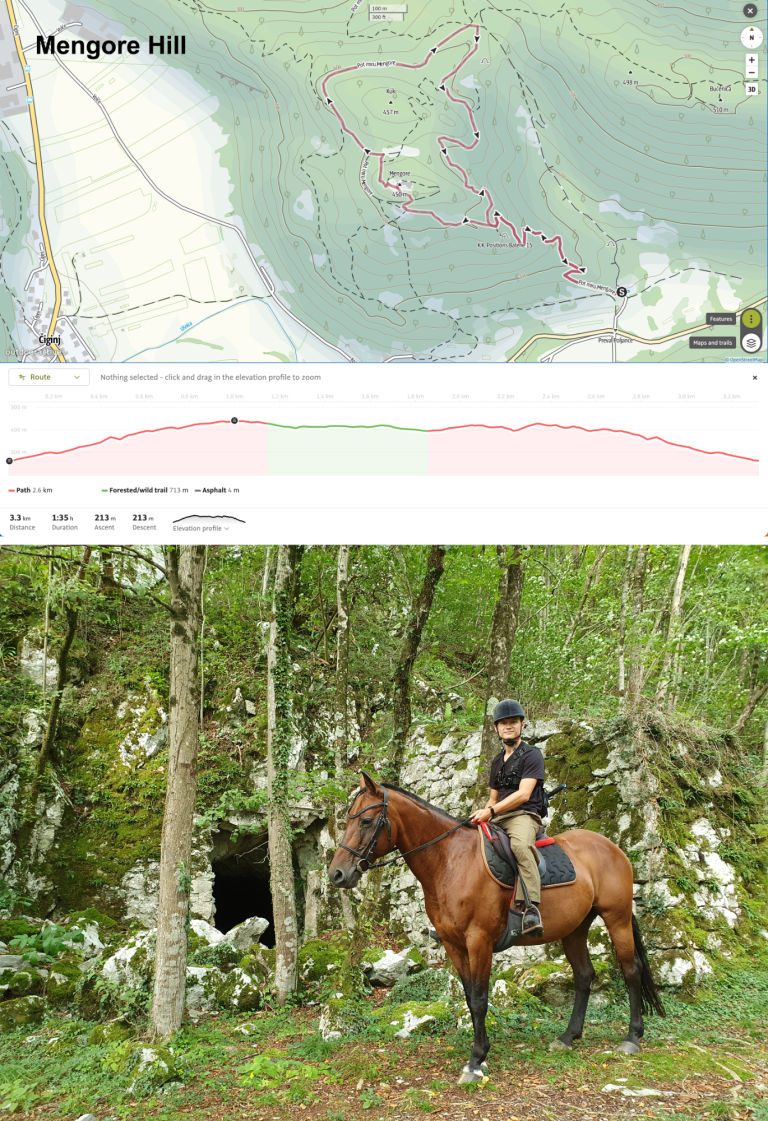
6 Mengore Hill
3.3 km, 213 m ascent, walking time 1:35, allow 3 hours. Easy.
Mengore Hill was a vital part of the Austrian defences in front of Tolmein/Tolmin, a steep and impregnable hill that is covered in shelters and positions. Park at the carpark at the foot south-east flank and follow the route up and around the hill, keeping an eye out for shelters hidden amongst the undergrowth. There’s a riding stable (Ranč Pelance) at the foot of the hill, and if you pre-book you can get the owner to rent you some horses and escort you around the hill (suitable for complete novices), a truly magical experience.
Warning: You undertake this walk at your own risk, and neither the author nor publisher can accept any responsibility if things go wrong.
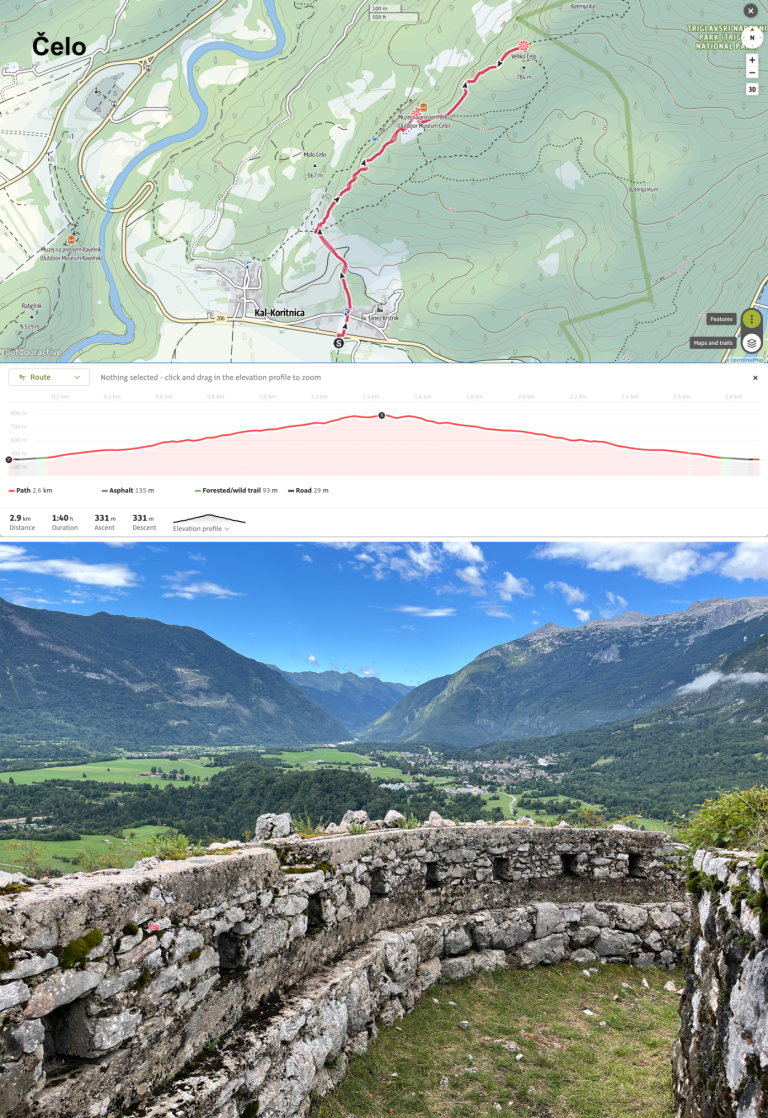
7 Čelo
3.0 km, 330m ascent, walking time 1:40, allow 3 hours. Easy.
Park in the carpark on the outskirts of Kal-Koritnica and walk north through the village (the path up is through a narrow gap between two buildings), following signs for Pot Miru (Walk of Peace). After one kilometre you’ll reach the extensive Austrian second-line positions at Čelo, which have fantastic views over the Bovec basin. Another 400 m takes you to the summit of Čelo, with great views north towards the forts of Kluže and Hermann. Return the way you came, then drive round the corner to visit the Austrian positions at Ravelnik.
Warning: You undertake this walk at your own risk, and neither the author nor publisher can accept any responsibility if things go wrong.
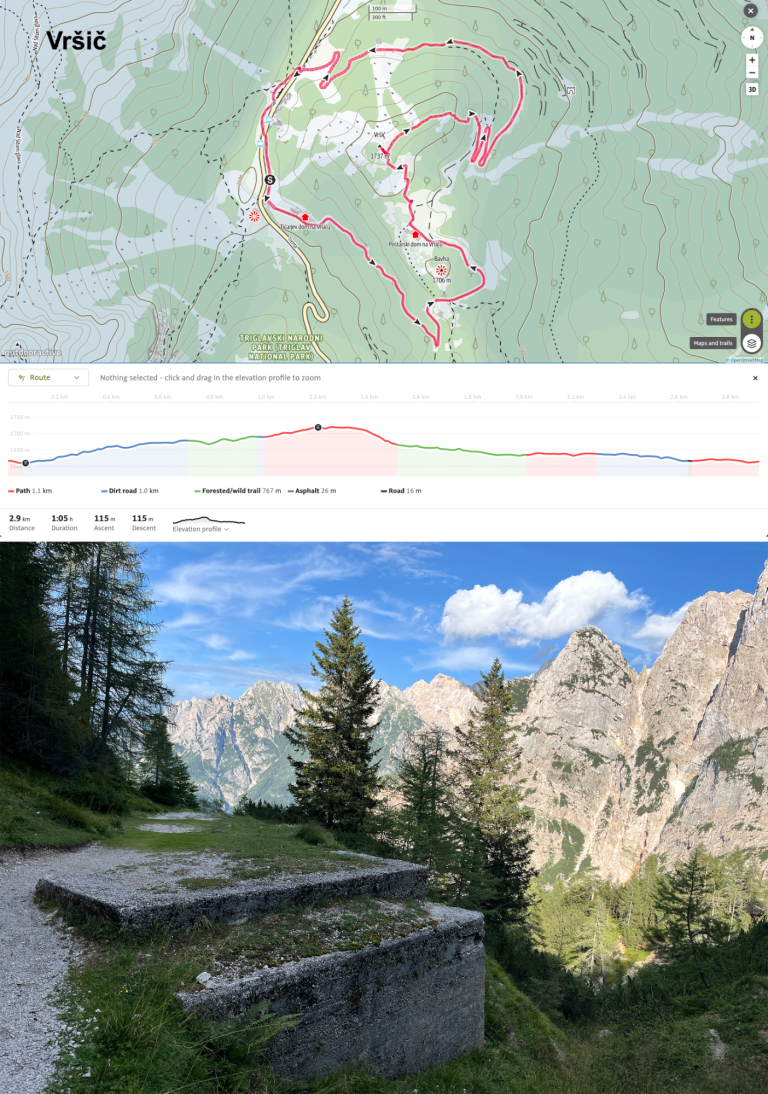
8 Vršič
2.9 km, 117 m ascent, walking time 1:05, allow 2 hours. Easy.
Park somewhere near Tičar refuge on the strategically important Vršič Pass. It gets pretty busy up here in summer, so go early or mid-week, and be aware that the walking route crosses the main road twice, so don’t get run over. Follow the route in an anti-clockwise direction, and even though you’ve only walked a kilometre stop at Poštar refuge for a drink while you admire the huge wall of mountains to the east (wonderful Alpenglow in the evenings, if you’re lucky). Continue to the summit of Vršič for a great 360-degree view and to reflect on the thousands of Russian prisoners who died here, and then descend back to the car via the hairpins which are part of the original road built by the Russians. If you have time, drive down to the Russian chapel on the pass 5 km to the north-east.
Warning: You undertake this walk at your own risk, and neither the author nor publisher can accept any responsibility if things go wrong.
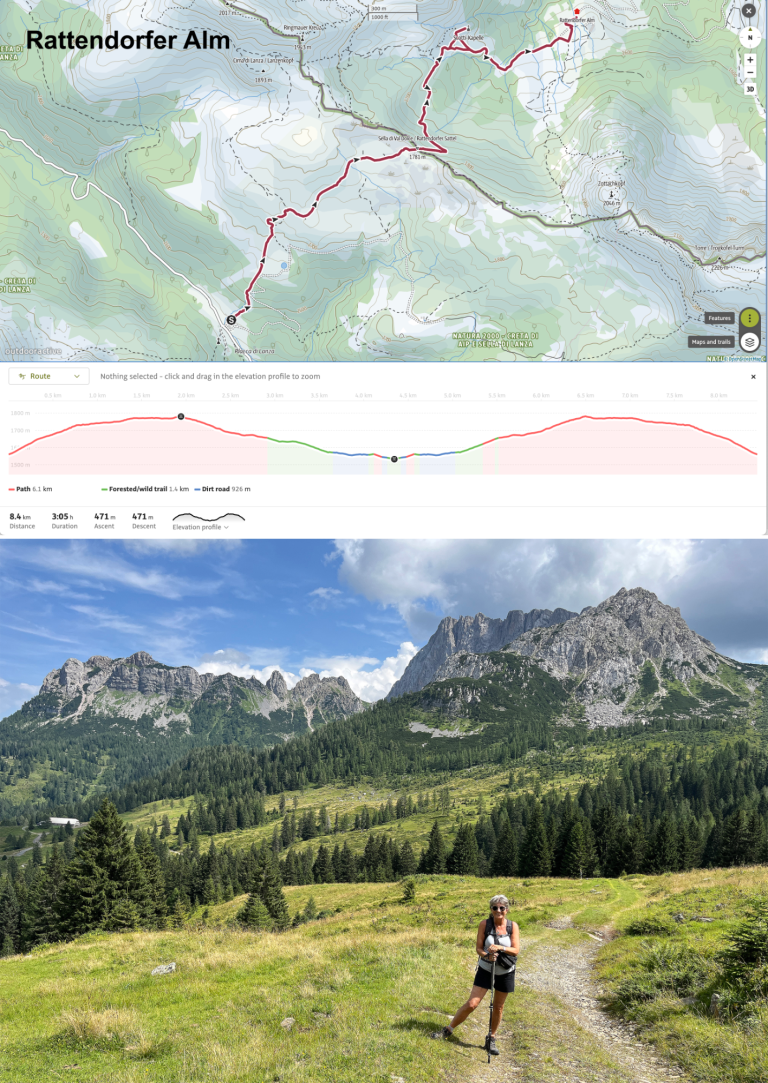
9 Rattendorfer Sattel
8.4 km, 471 m ascent, walking time 3:10, allow 5 hours. Easy-Medium.
Park at Malga di Cason Lanza at Passo Lanza (nearest town is Pontebba), and walk north up the initially steep slope towards Rattendorfer Sattel — this was the forward slope for the Austrians, the Italians were dug in across the valley behind you. After half a mile the slope eases, the walking becomes easier, and the views open up. The top of the saddle marks the border, and you then descend down to Rattendorfer Alm refuge in Austria, taking a short detour to look at the Scotti chapel, originally built during the war and subsequently restored. Like in many of these mountain refuges, the local produce comes from within 200 m of where you’re sitting, and is delicious. Retrace your steps over the border and back to the car.
Warning: You undertake this walk at your own risk, and neither the author nor publisher can accept any responsibility if things go wrong.
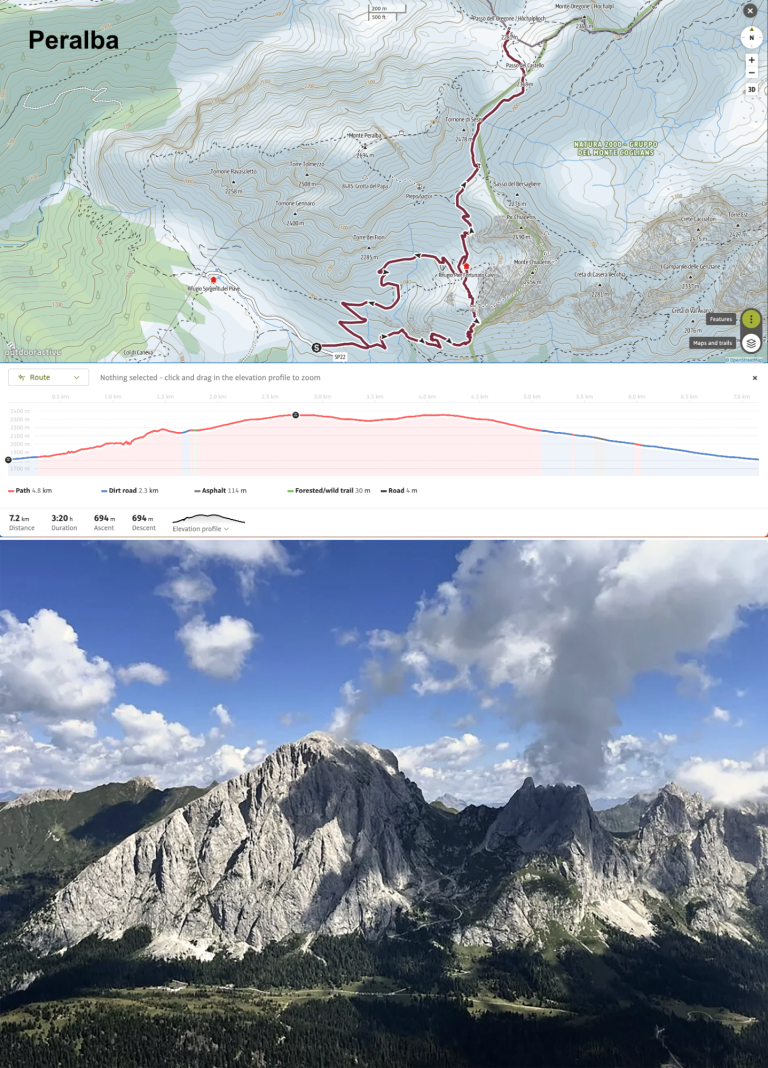
10 Peralba
7.2 km, 694 m ascent, walking time 3:20, allow 5 hours. Medium-Hard.
Monte Peralba is one of the few places where access to the front lines in the Carnic Alps is relatively straightforward, and Peralba saw a lot of action during the war. Park just short of Rifugio Sorgenti del Piave, which sits next to the source of the River Piave, and walk north-east towards Rifugio Calvi. After 1500 m you’ll climb a small ridge topped with Austrian trenches dominating Passo Avanza. Continue north to Rifugio Calvi for refreshments, then keep going north to the important Passo dell’Oregone. The views to your right of Monte Avanza and the upper Fleons valley are stupendous, and there are still a few bits of WW1 stuff to explore along the route. From Passo dell’Oregone, return to Rifugio Calvi for lunch and then take the slightly easier route to the west, back to the car park.
Warning: You undertake this walk at your own risk, and neither the author nor publisher can accept any responsibility if things go wrong.
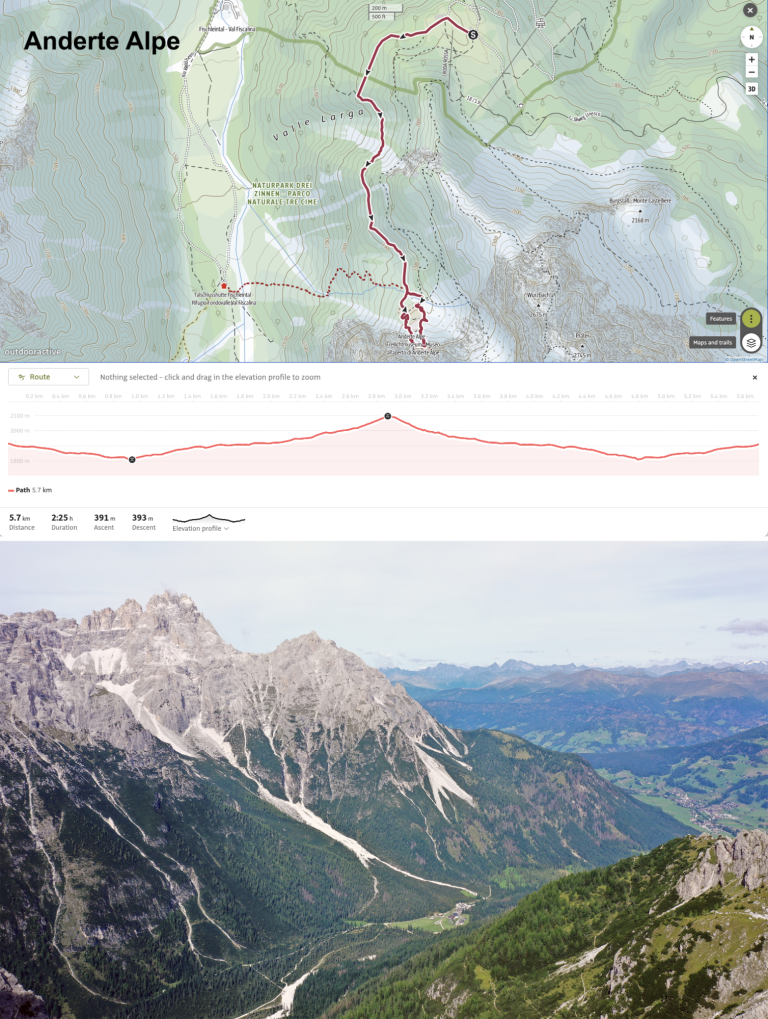
11 Anderte Alpe*
5.7 km, 391 m ascent, walking time 2:25, allow 4 hours. Medium.
If you want to have a look at the Austrian side of Sextener Rotwand (Croda Rossa), a visit to Anderte Alpe (the Austrian military village on their side of the mountain) is a great way to do that. Get the cable car up from Bad Moos (yes, it makes me laugh every time too) to Rotwandwiesen and then follow the signs west and then south to Anderte Alpe — a 90-minute, 3 km hike with 320 m elevation gain. There are numerous trenches, positions, barracks and seilbahn emplacements to explore, and great views south to the Sextener Rotwand and Sentinella Scharte. You can return the way you came, or if your knees are up to it, you can descend into Val Fiscalina for lunch at the Talschlusshütte refuge (1.6 km, 1 hour, 410 m descent), and then walk back to Dolomitenhof and then Bad Moos (another 4km, one hour, all gentle downhill on good paths).
Warning: You undertake this walk at your own risk, and neither the author nor publisher can accept any responsibility if things go wrong.
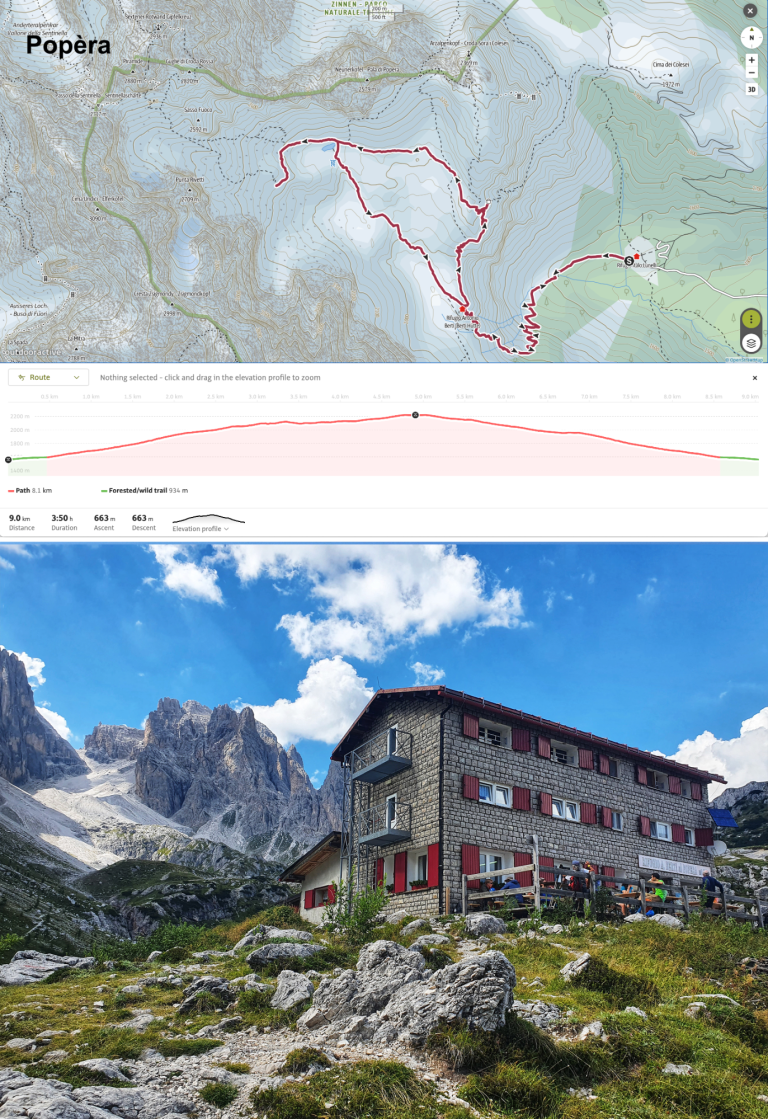
12 Popèra*
9 km, 663 m ascent, walking time 3:50, allow 5 hours. Medium-Hard.
Getting up close and personal with Croda Rossa and Cima Undici (Sextener Rotwand and Elferkofel) in the Popèra group, is very hard. There are sensational vie ferrate on both of these mountains, but please don’t tackle them without extensive experience, the correct equipment, a high degree of physical fitness, and a mountain guide. Instead, drive to Padola and then up Val Grande to the carpark. From here get the shuttle bus (a couple of €) up to Rifugio Lunelli, a significant Italian supply base during the war and now purveyor of excellent fruit tarts. Walk west from the rifugio, climbing out of Val Grande and up to Rifugio Berti in Vallone Popèra (2.2 km, 370 m ascent, 90 minutes). After a quick coffee, head due north on the path that hugs the ridge at the head of Val Grande until you reach the abandoned Rifugio Olivo Sala, the main Italian HQ in the Popèra sector. Turning north-west, make your way to Laghetto Popèra, and then on for another few hundred metres so that you can get a view past Sasso Fuoco to Croda Rossa. Return to Rifugio Berti on path 101 for well-deserved refreshment, and then back to the carpark.
Warning: You undertake this walk at your own risk, and neither the author nor publisher can accept any responsibility if things go wrong.
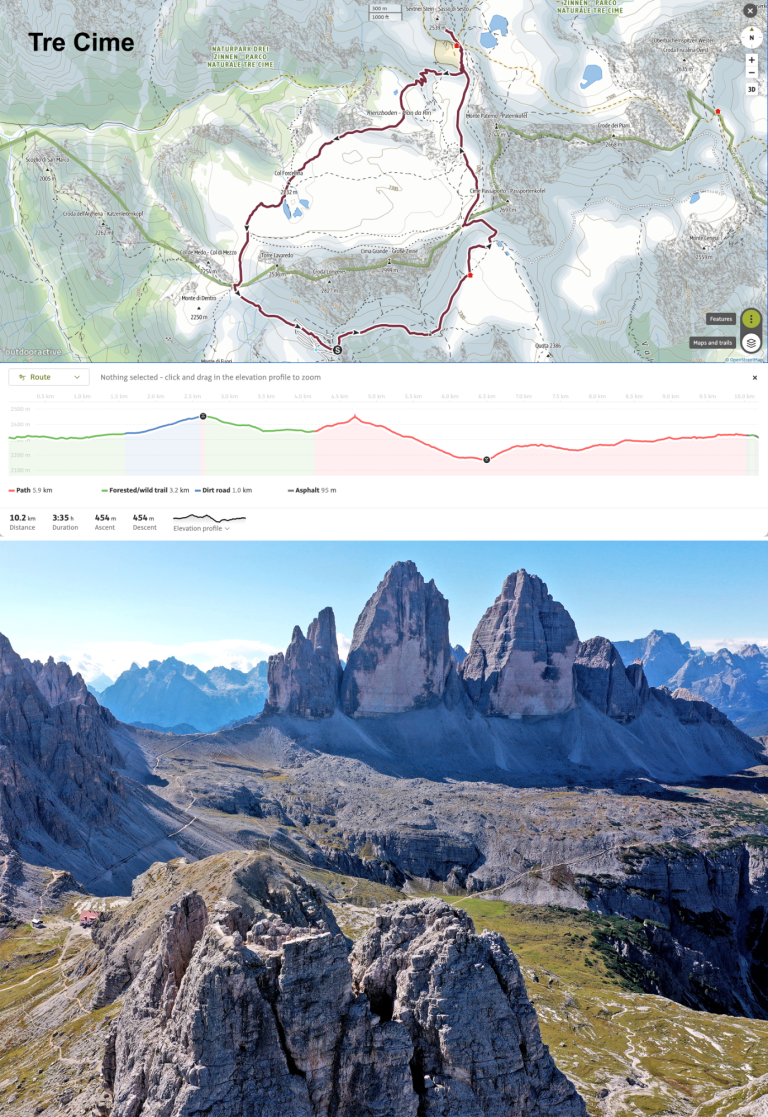
13 Tre Cime
10.2 km, 454 m ascent, walking time 3:35, allow 5 hours. Medium.
This is the easiest of several ways to get to the Tre Cime di Lavaredo (Drei Zinnen), but it comes at a financial cost. A toll-road runs from Misurina up to Rifugio Auronzo, where the walk starts, but it’s pretty expensive (€40 for a car in the summer of 2025) and you have to book online beforehand. The more sensible option is to catch the bus up there from Misurina, which in Summer 2025 cost €4. It also gets very busy up there in high season, especially at weekends, so mid-week in late June or early September are the best options. However, the circular walk around the Tre Cime is absolutely stunning, taking you into the middle of the battlefield where you can see Monte Paterno, visit the tunnels at Sasso di Sesto (Sextenerstein), and have lunch at Rifugio Locatelli (Drei Zinnen Hütte). The natural beauty of this place, dotted with emerald lakes and surrounded by the towering Dolomite peaks, is quite extraordinary.
Warning: You undertake this walk at your own risk, and neither the author nor publisher can accept any responsibility if things go wrong.
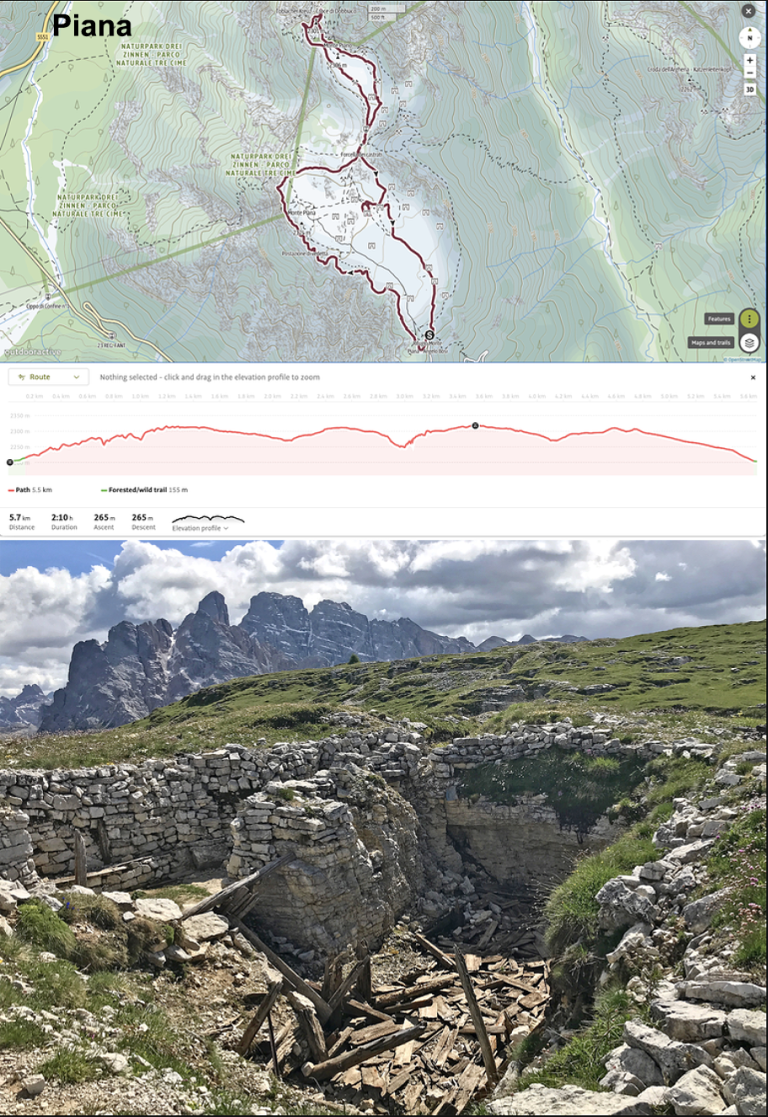
14 Monte Piana*
5.7 km, 265 m ascent, walking time 2:10, allow 4 hours. Easy
I recommend taking the 4x4 “Jeep Taxi” up to Monte Piana from the north end of Lake Misurina, because it saves you three hours hiking and an additional 450 m of ascent. Plus, it’s quite fun. You can even get up there in winter on a snowmobile, but you can’t see the trenches properly because they’re full of snow. From the drop-off point at Rifugio Bosi the route takes you in a clockwise route around the battlefield, starting in the Italian reserve positions, crossing Forcella dei Castrati to the Italian first line positions, and then around the Austrian positions on the northern part of the mountain. From here it’s easy to see how overlooked the battlefield was, from Tre Cime in the east to Cristallo in the west. Return to Rifugio for a look at their small museum there, some lunch, and to await the 4x4 back down the mountain.
Warning: You undertake this walk at your own risk, and neither the author nor publisher can accept any responsibility if things go wrong.
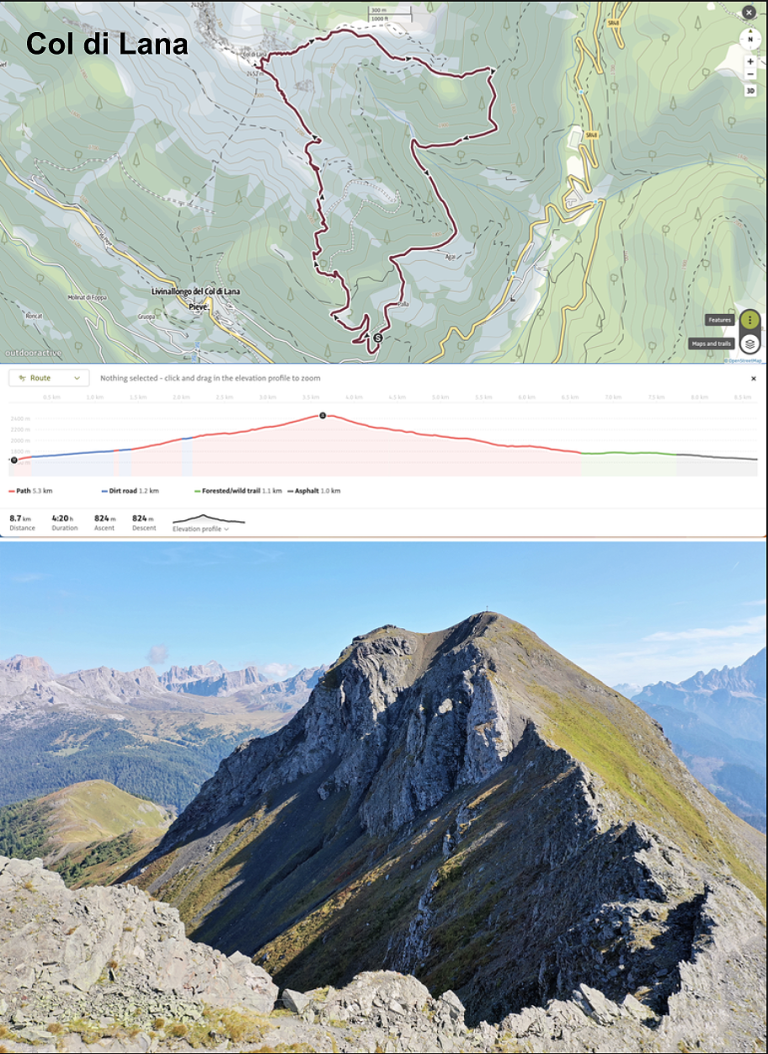
15 Col di Lana
8.7 km, 824 m ascent, walking time 4:20, allow 6 hours. Hard.
There’s no easy way up Col di Lana. Not in 1916, and not now. You can approach from several different directions, but taking the Italian route up gives the best idea of what the troops had to contend with. From Pieve di Livinallongo take the small road towards Agai. In exactly a mile there’s a parking place on the right. Park, and follow the path on the left up to the summit. It’s a three-hour hike (including several five-minute rests), and you will pass the significant Napoleon’s Hat and the Panettone en route. At the summit you’ll find the chapel, and just to the north-east is a shallow depression, which is all that is left of the original mine crater. The 360-degree views from up here are sensational. If you’ve got the energy, you can head north-west along the ridge to Monte Sief where there are more physical remains, but it adds at least an hour to your day. You can return the way you came, or return on my suggested route via Il Fortino and the Valley of Death.
Warning: You undertake this walk at your own risk, and neither the author nor publisher can accept any responsibility if things go wrong.
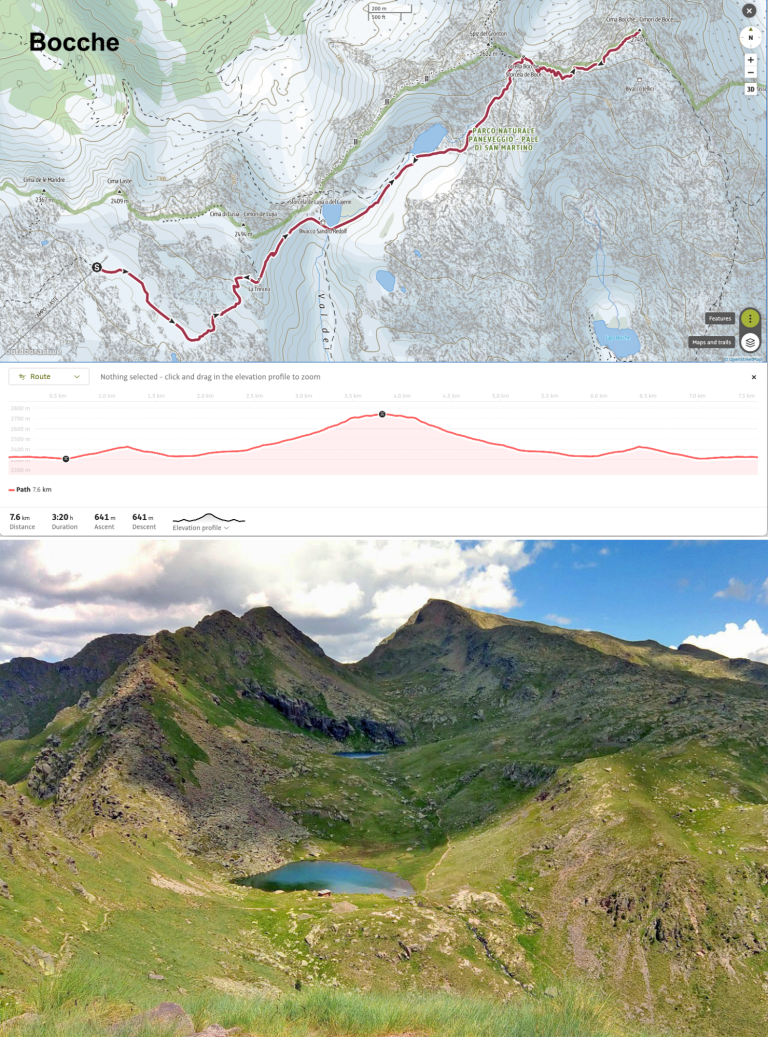
16 Bocche*
7.6 km, 641 m ascent, walking time 3:20, allow 5 hours. Medium.
From Ronchi in Valle di San Pellegrino, take the cable-cars and chairlifts up to Lasté, then walk east on path S4 to Lago di Luisa Inferiore, and then on to Lago di Luisa Superiore, past lots of WW1 trenches and positions. From here the path leads quite steeply (climbing 1,000 ft in a mile) to Forcella Bocche and Cima Bocche, the lynchpin of the Austrian defences in this area. To the south lies the basin around Lago di Bocche, where most of the fighting happened in this area, and to the north you get fantastic views of Costabella ridge, Ombreta, and the south face of Marmolada. If you’re feeling energetic, descend part of the way down the east ridge where you’ll find more trenches; otherwise retrace your steps to the Lasté chairlift. If you’re exhausted take the lifts back down to the pass, but if you can manage another half hour of walking (downhill), walk west on S4 to Rifugio Passo Luisa for a late lunch with great views, and then get the lifts down from the nearby Le Cune lift station.
Warning: You undertake this walk at your own risk, and neither the author nor publisher can accept any responsibility if things go wrong.
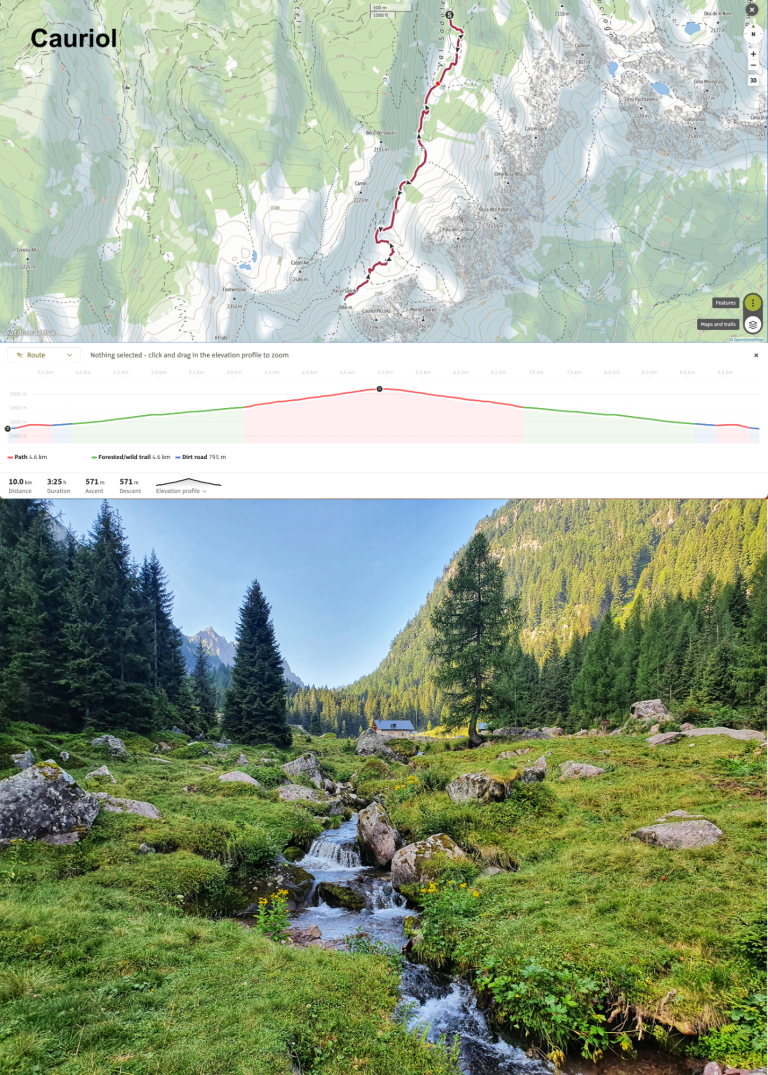
17 Cauriol
10 km, 571 m ascent, walking time 3:25, allow 5 hours. Medium-Hard.
One of the few places in the Lagorai that it relatively easy to get to, Cauriol was an important defensive peak during the war. Park at Baita Sadole and walk 1 km south to the rifugio for coffee and a look at the WW1 water-trough. Suitably fortified, keep going south as you climb to the head of the Sadole valley, initially on the old military road. At Passo Sadole there are remnants of Austrian barracks and good views south to Cima d'Asta and Passo Cinque Croci. Walk east around the foot of Monte Cauriol to Sforcella del Cardinal for incredible views east up Val Fossernica and down Valle del Vanoi. If you’re feeling energetic you can hike up to the saddle between the two peaks, but it’s steep and it adds an extra 300 m ascent and 90 minutes to your day. Return to the rifugio for a late lunch.
Warning: You undertake this walk at your own risk, and neither the author nor publisher can accept any responsibility if things go wrong.
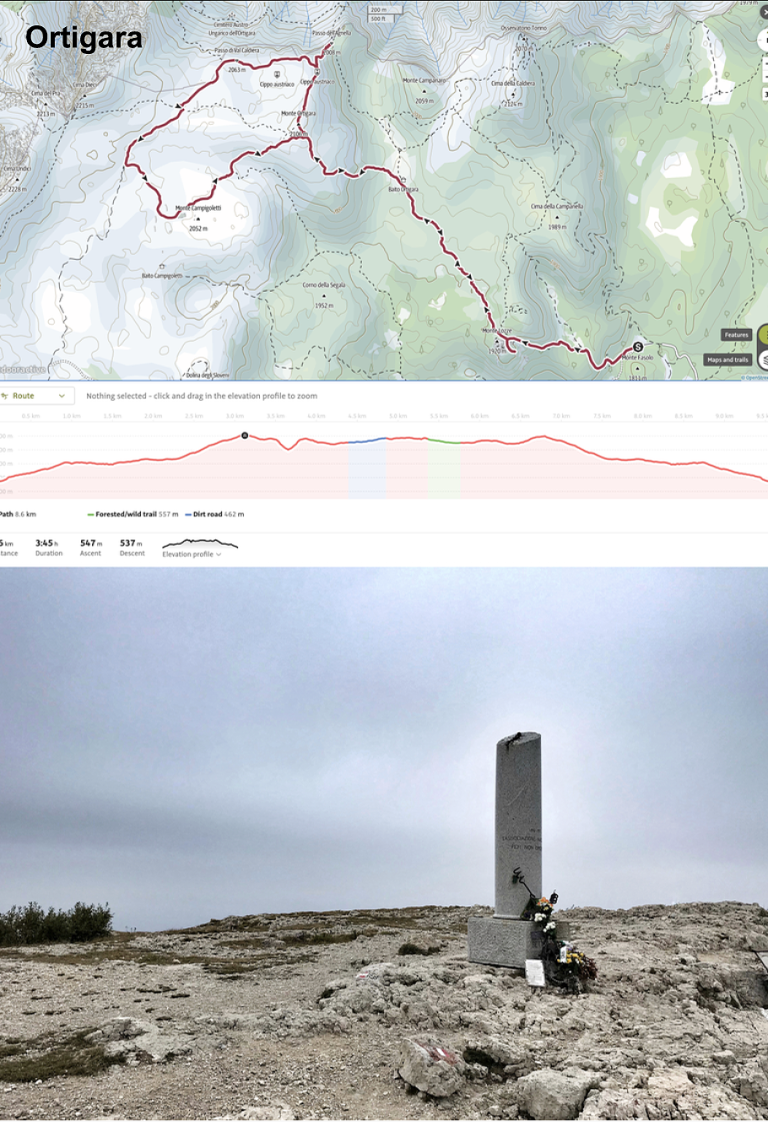
18 Ortigara
9.6 km, 547 m ascent, walking time 3:45, allow 5 hours. Medium.
Park at Piazzale Lozze and walk 1 km west to Rifugio Cecchin for coffee and cornetti. Suitably fortified, have a quick look at the trenches and memorial on Monte Lozze, then walk north-west down into the Pozza dell’Ortigara (Baito Ortigara). This flat clearing is where thousands of Italian troops were slaughtered by Austrian guns. From here the path leads up through the Austrian trenches to the summit Ortigara, rising 500 ft in half a mile, where a “broken” column memorial sits. Heading north you’ll come to the Lepozze positions and an Austrian memorial, and a bit further on you come to Passo dell’Agnella, with more positions, tunnels, and fantastic views over Val Sugana.
Now head west along the north side of Dolina Grande to the Austrian second-line positions, then turn south-west and follow the route to Campigoletti. There are numerous remains of shelters and trenches to poke around in (mind you head) along the way. From Campigoletti you get an idea of just how vulnerable the Italian troops were in Pozza dell’Ortigara. Return to the car park the same way you came.
Warning: You undertake this walk at your own risk, and neither the author nor publisher can accept any responsibility if things go wrong.
19 Zebio
8.1km, 288 m ascent, walking time 2:45, allow 4 hours. Easy.
Park at Malga Zebio and explore the Crocetta trenches and caverns a few hundred yards to the east (beware of inquisitive cows). From there, walk south to the Scalambron mine warfare memorial (the mine that went off in a thunderstorm 24 hours before it was supposed to), then follow the route south-west to visit assorted Italian and Austrian cemeteries featuring crosses with little roofs on, returning to the Malga via Monte Zebio. Basic (and delicious) refreshments are available at the Malga.
Warning: You undertake this walk at your own risk, and neither the author nor publisher can accept any responsibility if things go wrong.

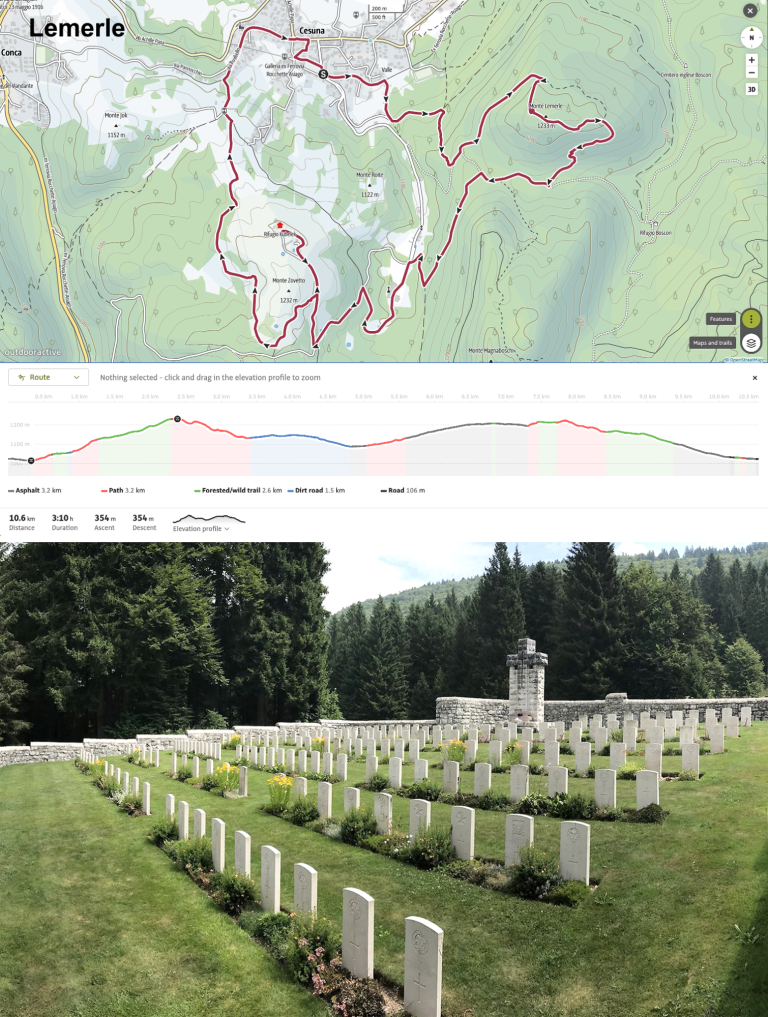
20 Lemerle
10.6 km, 355 m ascent, walking time 3:10, allow 5 hours. Medium
The British bit. Park in Cesuna and follow the route east to Monte Lemerle, where you’ll find lots of overgrown positions, and the 9th Staffs command post on the southern side. Turn south-west and walk down to the Italian and British cemeteries at Magnaboschi. Continuing south-west you will need to join a tarmac road for a few hundred metres, but there is little to no traffic on this road so it’s not a problem. Have lunch at Rifugio Kubelek, which has excellent views over the Altopiano to the north and east. After lunch walk back down the road that brought you up, and after 500 m take the path on your right that goes to British positions on the reverse slope of Monte Zovetto. Continue north on this path back to Cesuna (note the memorial on the outskirts of town to the Italian Granatieri killed during the Strafexpedition).
Warning: You undertake this walk at your own risk, and neither the author nor publisher can accept any responsibility if things go wrong.
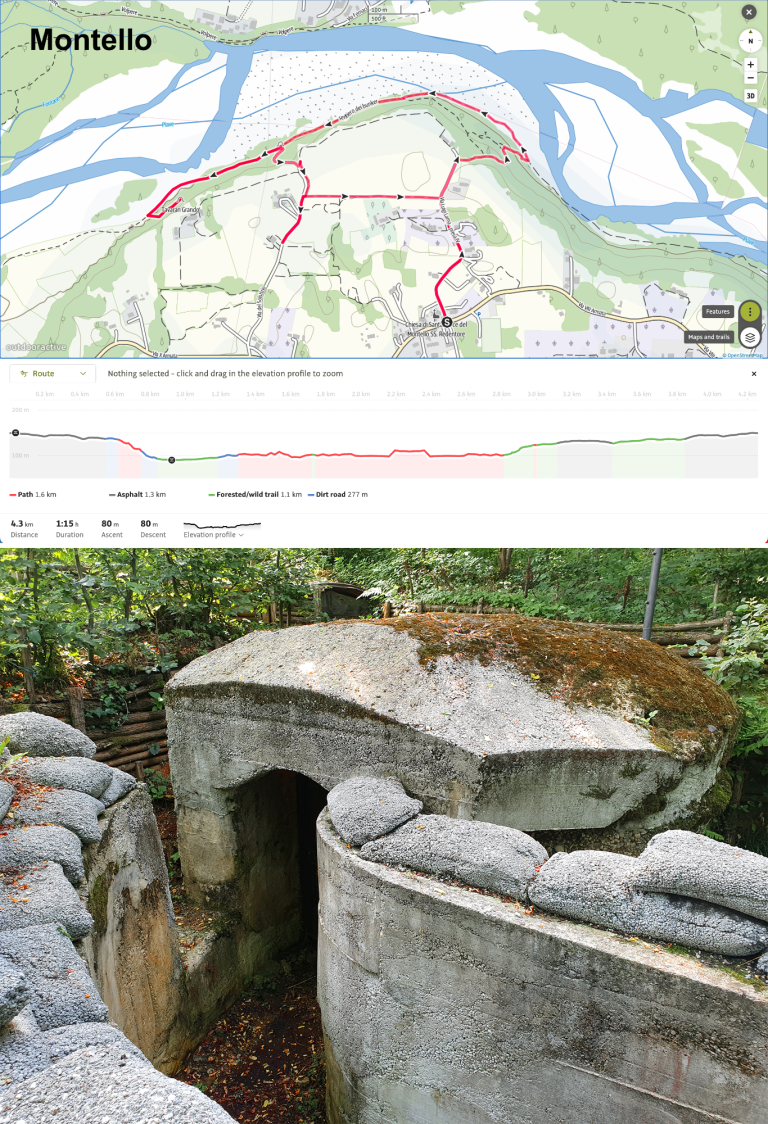
21 Montello
4.5km, 61 m ascent, walking time 1:45, allow 3 hours. Easy.
Park in Santa Croce del Montello and walk north on Via Luigi Lama towards the Piave river. A small memorial opposite the church includes a WW1 pontoon boat, anchor, and assorted artillery rounds. At the bottom of the hill (approx 500 m from the church) take the path on your right which wiggles down through the trees to the riverbank of the Piave. Turn west and follow the river for a mile. On your left you will pass numerous Italian dugouts and bunkers, opposite is the town of Falzè. This was the busiest (and narrowest) part of the Piave in 1918. After visiting Grotta Tavaran Grando, head back the way you came for 500 m and then turn south away from the river for 500 m. If the gates to the vineyard on your left are open, go in to see the memorial to Gordon Donald McLean (this is private property, so please be respectful). Return to the car.
Warning: You undertake this walk at your own risk, and neither the author nor publisher can accept any responsibility if things go wrong.
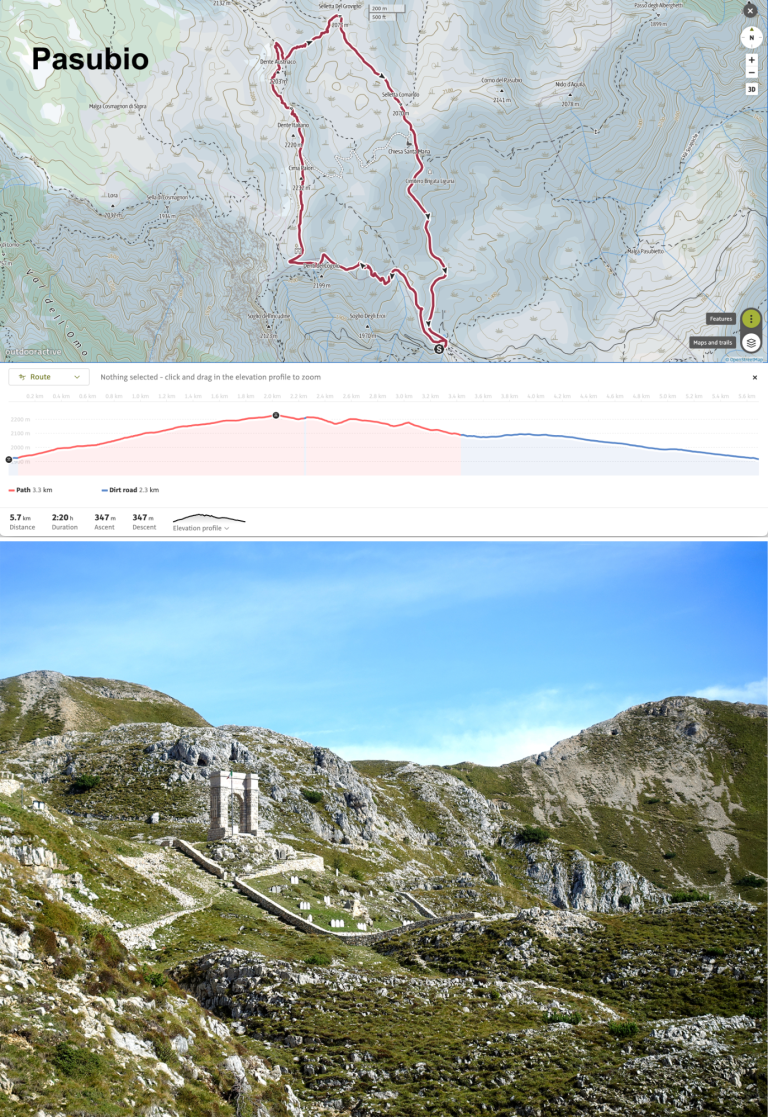
22 Pasubio*
5.7 km, 347 m ascent, walking time 2:20, allow 4 hours. Medium
If you want to explore the Pasubio battlefields, it’s realistically a two-day hike because to do it in one day requires 17 km of hiking, 1250 m elevation gain, and 10 hours. My recommendation is to park at Bocchetta di Campiglia (pay and display machines only take coins, so take mountains of €1 coins) and hike up the Strada 52 Gallerie to Rifugio Achille Papa in the afternoon (5.6 km, 800 m ascent, 4 hours), stay overnight, explore the battlefields the next morning, and hike down in the afternoon. A shorter version is to just hike as far up the Strada 52 Gallerie as you want, then head back down again when you’ve had enough. You won’t get to see the battlefields, but the tunnels of the Strada 52 Gallerie are worth experiencing. From Rifugio Achille Papa, walk north to Cima Palon, then the two “Denti”. There are lots of tunnels and positions you can explore, but take care not to fall down anything, or get trapped (usual disclaimers apply). Return via Passo Sette Croci and the cemetery with the Roman arch, then head back down to the car the same way you came up.
Warning: You undertake this walk at your own risk, and neither the author nor publisher can accept any responsibility if things go wrong.
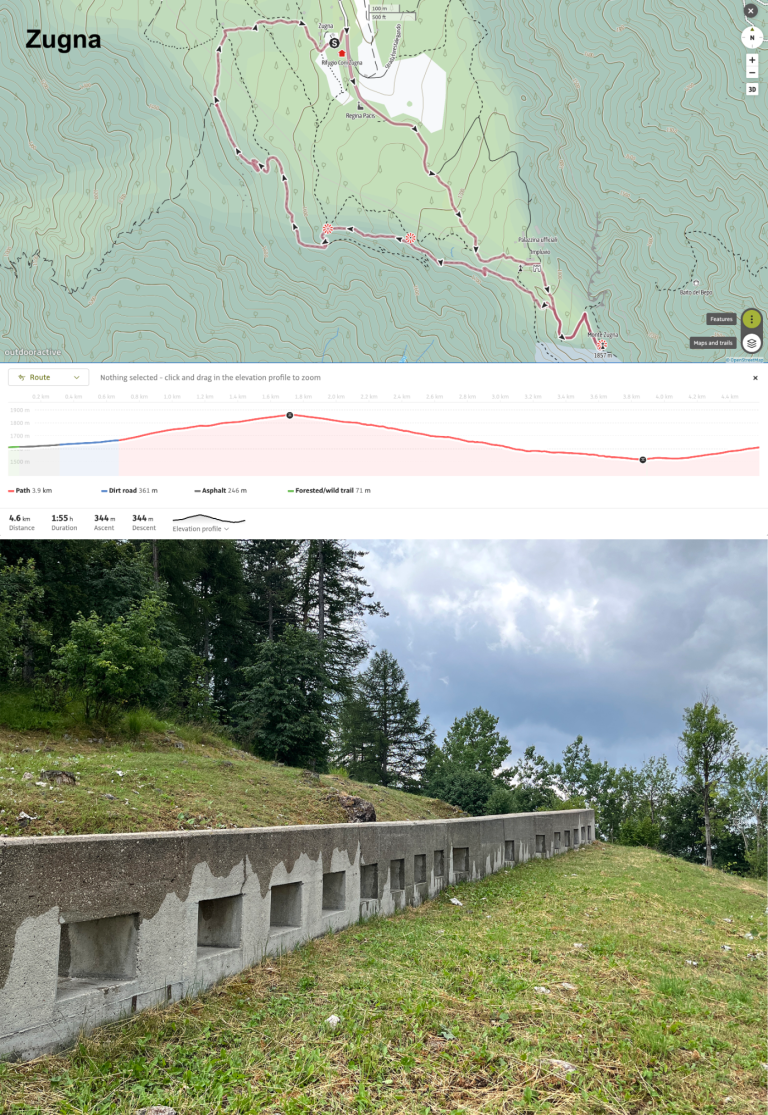
23 Zugna
4.6 km, 344 m ascent, walking time1:55, allow 4 hours. Medium
In Albaredo on the SP89, turn west on the road signposted Monte Zugna and follow it south. After 9 km you’ll come to some reconstructed trenches, then after another 3 km you come to Rifugio Monte Zugna. Park and walk south. There are extensive positions and buildings to explore, with info boards. Walk up to the summit of Monte Zugna for fantastic views east to Monte Pasubio, and west to Monte Altissimo. Retrace your steps to the rifugio, via the lower path through the woods, where you’ll get an excellent lunch of local produce. If one of you could give the custodian the €7 that I still owe him from my last visit, I'd be very grateful.
Warning: You undertake this walk at your own risk, and neither the author nor publisher can accept any responsibility if things go wrong.
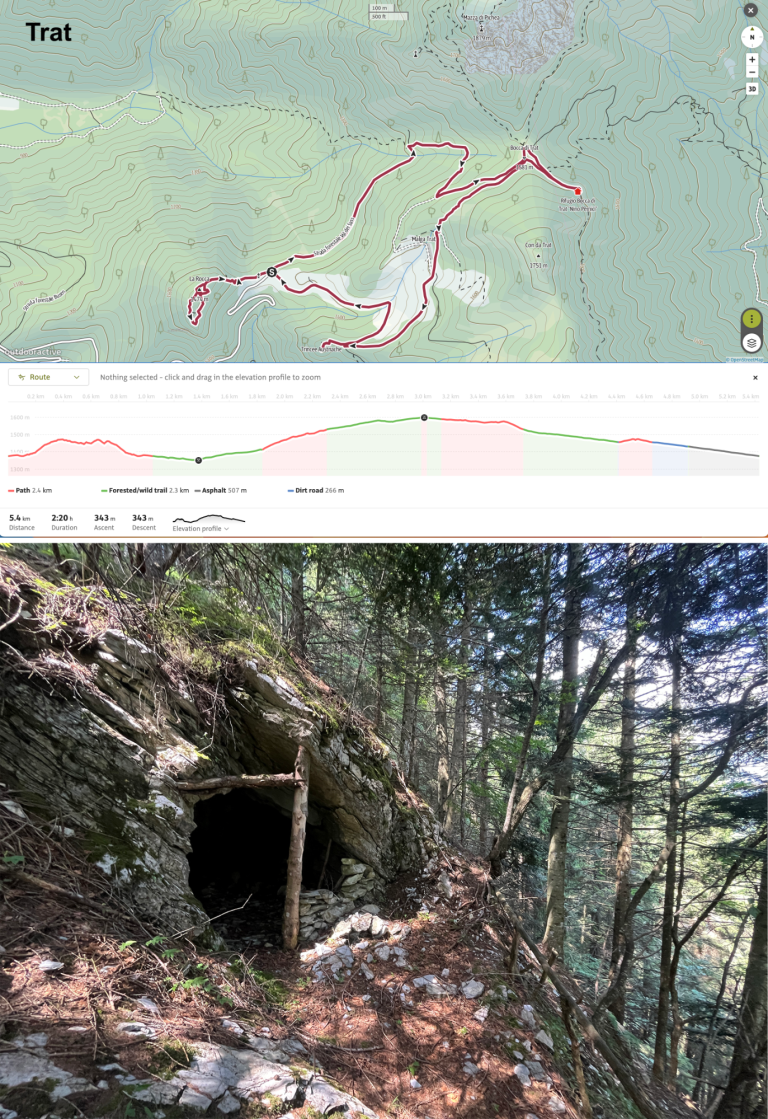
24 Trat
5.4 km, 343 m ascent, walking time 2:20, allow 4 hours. Easy.
One of the few relatively accessible places in the Ledro sector, Trat was an important position for the Austrians dominating the Concei basin and routes north from Riva del Garda. From the parking area walk west along the path to the positions at La Rocca, and Austrian strongpoint during the war. After poking around among the very overgrown positions, head back to the car and walk north-east along the path that leads up to Bocca di Trat. From here the rifugio is 300 m to the south-east, or you can take a detour north to Mazza di Pichea, a group of rocks that was home to extensive multi-storey Austrian barracks. This will add an extra hour, but the views from the top are wonderful. Walk back along the road to the car, taking a short diversion (signposted to your left) to the Austrian trenches on your way.
Warning: You undertake this walk at your own risk, and neither the author nor publisher can accept any responsibility if things go wrong.
25 Quinto Alpini*
7.4 km, 776 m ascent, walking time 3:45, allow 5 hours. Hard.
This hike starts at Baita Pastore in Val Zebrù, but you have to get there first. You can walk up Val Zebrù from Sant'Antonio, but that will add 8.3 km, 569 m of ascent, and 3:05, on the way up, and 8.3 km, 95 m of ascent, and 2:30 on the way back. For most people (me included), a 24 km, 10-hour day with 1440 m of ascent is too much, so get a 4x4 taxi from Sant'Antonio to Baita Pastore, and pre-arrange a time to be collected later in the day (Google “Val Zebrù 4x4 taxi” for details). From Baita Pastore walk north following signs to Rifugio Quinto Alpini. The path is steep but in good condition, taking you up to the refuge that during WW1 served as the headquarters of the 5th Alpini regiment. There’s a great look-out position just above the hut, with sensational views across to Monte Confinale in the south, and north to Thurwieser, Eiswand and Zebrù. Do not be tempted onto the glacier unless you’re roped up to a guide (which can be pre-arranged through the Custodian at Quinto Alpini). Allow at least 90 minutes to hike back down to Baita Pastore.
Warning: You undertake this walk at your own risk, and neither the author nor publisher can accept any responsibility if things go wrong.

26 Filone dei Mot
7.7 km, 681 m ascent, walking time 3:45, allow 5 hours. Hard.
A significant hike with plenty of altitude gain, but the path is good underfoot. Park at Passo dello Stelvio and walk south to Passo Platigiole (signposted Livrio), then turn west to climb Scorluzzo. A side path leads to the sub-peak of Scorluzzino, where there are some significant remains from WW1. From the summit of Scorluzzo take the path that descends south-west, enjoying the sensational views of the Kristallokamm ridge to your left. After 800 m you come to a well-preserved Italian observation post (osservatorio), the most forward Italian position on Scorluzzo. Another 1500m along the path brings you to your destination — Filone dei Mot (aka Alpinidorf), a substantial stone-built military village constructed by the Italian Alpini troops. Retrace your route back to the Stelvio for over-priced refreshments and tacky souvenirs.
An easier version of this hike (4 km, 542 m ascent, 2:30 round trip) can be made from Casa Cantoniera on the road from Bormio up to the pass, but it doesn't include Scorluzzo or the views across to the Ortler.
Warning: You undertake this walk at your own risk, and neither the author nor publisher can accept any responsibility if things go wrong.

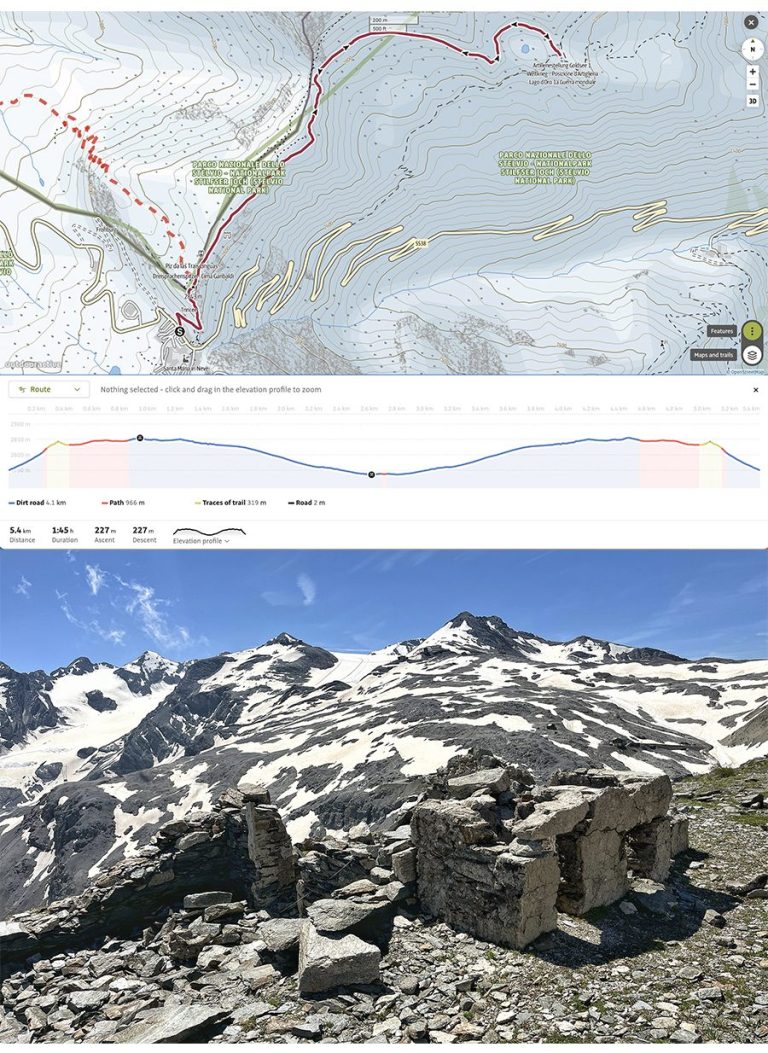
27 Goldsee
5.5 km, 223 m, total walking time 1:45, allow 3 hours. Easy.
Park at Passo dello Stelvio, cross the main road, and take the path just to the north-west of Hotel Genziana, leading up to Rifugio Garibaldi (which may or may not be open). At the top you are at Dreisprachenspitze, the northern end of the Italian Front. The info boards are worth a few minutes of your time, then walk north-east along the path to the small lake at Goldsee. The views across to the Ortler on your right, and across into Switzerland on your left, are sensational. You will pass numerous remains of Austro-Hungarian barracks, cook houses, and command posts. Goldsee was the home of a small AH artillery park, from where they bombarded the Italians on the Eiswand and Thurwieser. Return the way you came. It can be quite cold up there, even in mid-summer, to take an extra layer just in case.
Warning: You undertake this walk at your own risk, and neither the author nor publisher can accept any responsibility if things go wrong.